Takeaways
- The canter is driven by a single hind limb that bears the horse’s entire weight before entering a moment of flight. Failing to train this movement equally on both leads causes severe muscle asymmetries, joint twisting and eventual hoof lameness.
- Because a horse can only alter its leg movement when its hooves are off the ground, riders must apply cues right before the single suspension phase. Apparent resistance or sluggishness from the horse is almost always the rider’s failure to time these aids correctly.
- Authentic collection occurs when a horse coils its loins to lift its forehand upward into a balanced, highly suspended stride. Forcing a horse to travel slowly without this rear-driven engagement creates a heavy, suspensionless shuffle that ruins cadence and damages joints.
Click here for Part 1: 13 Rules of Equine Movement
Click here for Part 2: The Equine Walk: “Mother of All Gaits”
Click here for Part 3: How the Trot & Pseudo-Trot Affect the Equine Hoof
Click here for Part 4: The Spectrum of Ambling Horse Gaits
Previous installments in this series have given readers the opportunity to learn about the walk, amble and trot from analysis of film footage and still photographs. This approach reveals some surprising details about equine movement and gives reasons why the farrier — not to mention the average horse owner — needs a clear concept of each gait.
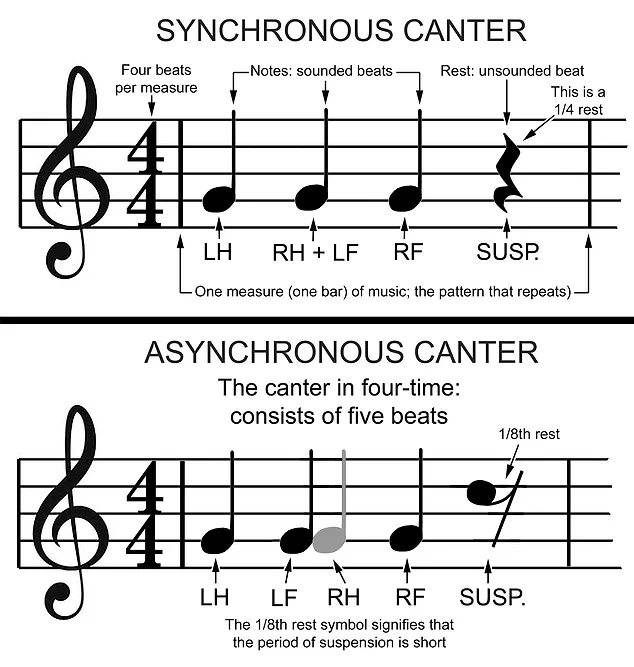
Those who have been following this series have learned that the trot is not a “two beat” gait as is often heard, but rather a four beat gait consisting of two sounded beats and two silent beats which are, in terms of musical notation, the exact equivalent of rests (See “Trot and Pseudo-Trot: Effects on the Hoof,” in the April 2026 issue of American Farriers Journal). This has prepared us to now learn basic facts about the canter gait.

Figure 2: The filmstrip sequence shows the swing of the limbs and the footfall order in a correctly cadenced canter. Image: Dr. Deb Bennett
Musical notation for the canter is shown in Figure 1. It should be no surprise to learn that Figure 1a debunks the idea that the canter is a “three-beat” gait. The canter is instead a four-beat gait, each bar of its music consisting of three sounded beats plus one unsounded beat (Figures 2 and 4). The unsounded beat — the period of suspension, during which the horse flies through the air with no foot in contact with the ground — is extremely important and here is why: There is only one such moment in each bar of canter music, whereas in each bar of trot music, there are two.

Figure 3: A filmstrip sequence shows the swing of the limbs and the footfall order in an asynchronous pseudo-canter or “jope,” in which the fore hoof (of what would have been) the coupled diagonal lands before its mate behind. Image: Dr. Deb Bennett
This means the rider must be aware of when the period of canter suspension is about to happen, because the moment at the beginning of the period of suspension is the optimal time to apply aids. There’s only one such opportunity per stride.
“Aids” — physical signals to the horse, consisting of touches or weight shifts by the rider — tell the horse the rider wants it to make some kind of change in the way it is moving. This could be to either increase or decrease speed, shorten or lengthen steps, stop, turn or change gait. All these changes come down to one thing: They require the horse to alter the swing of its legs. The only time when a horse — or a person for that matter — can do this is when the leg or legs that need to change are out of contact with the ground.

Figure 4: A filmstrip sequence illustrates a rider and horse performing a correctly cadenced canter with plenty of power and energy coming from behind. This sequence makes it very clear that the canter consists of four beats. Image: Dr. Deb Bennett
Prove this to yourself. Stand on your left leg and then, while continuing to stand on that leg, kick a football with your left foot. This is impossible, of course, but one may frequently observe riders asking horses to do it — and then complain the animal is sluggish or “resistant.”Slow response or non-response from the horse in these cases is not the horse’s fault, but the rider’s — because their timing is off. To be effective, aids must be applied at the correct moment and riders who have never thought about the periods of suspension at trot or canter will never find that moment. See “Resources” at the end of this article for information concerning how riders, as well as farriers observing riders and their horses to figure out how to help them, can learn how to time their aids with perfection.

Figure 5: Liftoff into the canter, the very beginning of Beat 1. Horse A is less highly schooled, older and has a longer back; therefore, when it canters, the forehand rises less. Horse B is at the Grand Prix level and is a stallion; it canters with more power and with more deeply flexed hind joints and therefore the forehand rises more. Image: Dr. Deb Bennett
Canter Beat 1: The Anchoring Hind LimbUnderstanding timing entails taking the canter apart into its component phases. This is necessary as the canter is a more complicated gait with more parts to it than the walk, amble or trot. We begin from the moment when the first hind limb touches ground. In the canter, this is called the “anchoring” limb because not only is it in reality (or you might say naturally) the first part or the basis of every canter, but because in the first phase, the horse stands on this limb alone (Figures 2, 4-6).

Figure 6: The horse departs into a left lead, lean to his right to weight the right hind hoof; then he must “raise the life” in his body – his energy output, to push down powerfully against the earth with the anchored hind limb and thereby be able to lift all three of the other feet off the ground. Image: Dr. Deb Bennett
Let me repeat that: In the first beat of canter, the horse immediately shifts its weight to one side — not forward. Let’s say the horse shifts its weight to the right, so it’s standing on the right hind limb with all three other feet lifted off the ground (Figure 6). The right hind limb thus anchors the whole body, because it alone bears the weight of the whole body.How it Affects Hoof Care
This is important for farriers to know, because unless the horse is relaxed and straight before it initiates the canter, the first phase can be hard on the anchoring hind leg. A horse that moves crookedly (with its spine at an angle to its line of progress), as well as a stiff horse, will twist the stifle, hock, ankle and coffin joint of the anchoring hind limb and the hoof will neither strike down nor break over in the correct place.

Figure 7: The owner of this Quarter Horse mare, a Western pleasure specialist, came in complaining she was short-strided, stiff and hard to turn. One look revealed a good part of the problem: hind shoes with trailers, which the owner believed she needed to straighten out her “crooked” hind limbs. The photos reveal, however, that she has very good conformation: A plane that bisects the stifle, hock, ankle and coffin joints orients outward to the front, inward to the rear. This is the normal, correct conformation in all horses (see AFJ July/August 2021), yet the owner believed the opposite. Note in view C that the mare stands correctly, with her hind toes oriented outward to the front and hocks oriented inward toward the rear. View C shows the effect of the trailers, which is to twist the hind limb so as to force the hind toes to face straight forward. This forces her to stand and move bowlegged, which twists every joint in the hind limb. Image: Dr. Deb Bennett
Bias trimming that lowers one of the walls of the hind hoofs is often used in a misguided attempt to “straighten” a horse’s hind stance. Hind shoes that have a trailer are also used for the same purpose (Figure 7). In and of themselves, bias trim and trailers act to twist the hind joints and alter hoof strike and breakover; combine that with a short-strided, stiff, crooked way of going and you have just written an invitation for lameness and joint injections down the road.
We want horses to work off the hindquarter, and that means the hind joints are going to take more of the load than they might have, had the horse never been ridden. This increases in importance as the athletic demand increases. For example, some owners think their horse will slide stop better in reining or turn around better if they “give it a little help” by using trailers. It is absolutely unreasonable, and does not bode well for the horse’s long-term soundness, to add to this burden by applying shoes or trims that twist the joints as the hock and stifle flex and extend through the cycle of protraction and retraction that occurs with every step of every gait (For more on the anatomy and natural alignment of the joints of the equine hind limb, see “Improve Your Eye for Equine Anatomy” in the July/August 2021 issue of AFJ).
If we begin with the strike-down of the left hind hoof, the footfall order in the canter is: Left hind; right hind and left fore as a coupled diagonal striking down together; right fore; suspension. The canter is classified, however, as an asymmetrical gait, meaning it can be performed on either the left or the right “lead.”
When the left hind is the anchoring limb, the animal performs a canter on the right lead; but when the right hind is the anchoring limb, the animal will do a left-lead canter, with the footfall order as right hind; left hind and right fore together; left fore; suspension. Obviously, whether the animal is on a right or a left lead makes a big difference, because the job of the anchoring hind limb calls for more strength and power from the muscles of the hindquarter than does the job of the opposite hind limb, which is sharing the work with a diagonally coupled forelimb.
This is why it’s extremely important to exercise the horse at the canter on both leads, because unless this is done, its body will develop asymmetries and crooked carriage, just as a weightlifter’s body would if he only did curls with one arm. Unfortunately, most horses are not asked — and many of them never offer — to canter on both leads. If you want to see horses cantering on only the left lead, attend the next rodeo that comes to town. If you want to see crooked, stiff horses that are difficult to get on one lead — with their riders using every trick in the book to get them to take the lead they don’t want to take — just attend any horse show in any discipline. Every farrier knows of owners who have “one-lead wonders,” and, of course, this affects the growth, shape, and development of the hind (as well as the fore) hooves. See “Resources” listed at the end of this article for information that farriers can hand out to clients that will help them learn how to develop their horse so that it willingly and easily takes either lead.
Canter Beat 2: The Coupled Diagonal
The strike-down of the coupled diagonal begins the second beat of canter (Figures 2 and 4). In the case of a canter that anchors from left hind, the coupled diagonal is right hind and left fore; it’s the opposite if the anchoring hind limb is the right hind.
The second beat of canter is usually perceived by riders as being the smoothest part, and this is because the horse’s weight is supported by two limbs instead of just one. Its weight flows forward from the coupled hind limb to the coupled forelimb, until the moment arrives when the hind hoof is picked up. The end of canter beat two comes when the coupled fore hoof is picked up.

Figure 8: The third beat is the least flattering phase of the canter and most riders prefer to look at photos of themselves in the first or second beat. View A is the author aboard Painty Horse. I am extremely proud of this photo, because it proves how very powerful and light Painty’s canter was. Even though it’s the third beat, he tilts very little downhill from rear to front. Compare this to the much greener horse in view B. He and his rider are doing nothing wrong, but their training has not come along as far. When a horse canters like Painty, it is very comfortable to sit. Images: Dr. Deb Bennett
Canter Beat 3: Effort of the Following ForelimbThe third beat of canter is its last sounded beat, which begins with the strike down of the singleton forelimb (Figure 8). When the anchoring hind limb is the left, the singleton forelimb will be the right fore; when the anchor is on the right, the singleton forelimb will be on the left. Notice that the singleton forelimb is the last of the four limbs to strike down (Figure 4), and yet we call this the horse’s “lead,” as if it were the first. If we were going to be logical, we would be talking about the horse’s “follows” rather than its “leads.”
The reason a canter that anchors or begins from the left hind leg is called a “right lead canter” stems from the rider or observer knowing nothing about the method of gait analysis that I am teaching here. Rather, they watch a horse that is on the right lead go cantering by (or they look at the sequence images in Figure 2) and notice the right pair of limbs (right fore and right hind) always appears to be trying to pass the left pair of limbs (left hind and left fore). So, they say the horse is on the right “lead.” This is true and not a terrible way to think of the canter, but it’s by far less useful than to think of the canter originating from one or the other anchoring hind limb. The method taught here also enables farriers (and riders) to understand and master maneuvers that grow out of the canter, such as turns on the haunches, rollbacks and pirouettes, all of which depend on having the horse anchor a hind limb. We’ll be taking a detailed look at those maneuvers in our next installment.
The moment just before the singleton forelimb breaks over and is picked up represents the last moment of contact of the horse’s body with the ground (Figures 2, 4, 8). Whereas better riding and training call for the horse to power its body mainly from effort of the muscles of the hind limbs. This makes it clear that some of the forward push is supplied by muscles of the forelimbs, primarily the latissimus dorsi and pectoral muscles.

Figure 9: Views A and B show horses at a trot; views C and D are enlargements showing their hind limbs at a canter. The hind hoof in horses A and C spends more time in the carry zone (green) than in the push zone (pink) because it rounds its back and coils its loins (flexes the lumbo-sacral joint, golden arrow). The hind hoof in B and D spends more time in the push zone than in the carry zone because it hollows its back and its loins are uncoiled. Note that there is only 9 degrees of difference in lumbo-sacral flexion between the two; a few degrees of difference in the topline makes a big difference in what goes on at the lower end of the limbs. The purple arrow marks the last point of contact of the toe of the anchoring hind hoof with the ground; green arrow marks the first point of contact of the advancing hind hoof with the ground. Images: Dr. Deb Bennett
How much of the power for cantering comes from the forelimbs is a question of balance, and I mean this literally: If the horse coils its loins (flexes the lumbo-sacral joint) and lowers its haunches by also flexing the hock and stifle joints, its body will tilt upward as it canters. This prolongs the time that the forelimbs are in the air and shortens the time they are on the ground.
In film analysis, time = weight. In other words, the less time the horse spends on the forelimbs, the less weight they bear. The effect of this, which is what “lightening the forehand” really means, is to greatly speed the breakover of the fore hooves, thus relieving not only the forelimb joints but also the suspensories and tendons. The opposite, which we observe in horses that make minimal and/or short-strided efforts with the hind limbs (Figures 3 and 9), occurs when the body tilts downhill to the front and the time/weight on the forelimbs is increased, with concomitant delayed breakover.
One other context in which effort of the singleton forelimb becomes critical is in the racing gallop, which will be featured in our next installment.
Canter Beat 4: Suspension
The last — and unsounded — beat of the canter is the period of suspension. This can vary in height, depending upon how much power the horse exerts with the muscles of the haunches and upon the degree to which it coils its loins and thus displaces to the front the point of ground contact of the anchoring hind limb.
As Figure 9 shows, the more the horse coils its loins and the farther forward the ground-contact point of the anchoring hind limb, the greater percentage of the hind step that will lie ahead of the red line, in the “carry zone.” The main effect of effort exerted by the hind limb contacting the ground in this zone is to push the body up — and upward movement of the body = suspension.

Figure 10: Horse A is performing a jope; horse B is performing a correctly cadenced canter. I have taken care to compare like to like here: both stock horses of the same breed and similar build. Footfall order is marked in each; note that in a jope, the diagonal pair that is supposed to be coupled comes apart, so that the fore hoof strikes earlier than its mate behind. The footfall order of the jope is the same as the walk with the addition, in some cases, of a brief period of suspension, which the horse achieves by a combination of momentum with an upward gesture of the neck and head. Images: Dr. Deb Bennett
Later in the stride, when the anchoring hind limb has passed behind the red line into the “push zone,” its main effect will be to push the body forward. Thus say the laws of physics. During the period of suspension, the horse’s body flies forward through the air: That’s the net effect of the combined upward and forward motions created by the effort of the hind limbs. The horse’s body describes an arc while it is in the air, so the higher the horse goes, the longer its slight forward will be as well.Obviously, if the horse’s hind limbs make a minimal effort, both the upward and forward components of its suspension will be small and the duration of suspension will likewise be short (Figure 3). Anybody who has attended a Western pleasure competition will have noticed this at the trot (as we mentioned in the April 2026 issue of AFJ), and it’s equally true at the canter.
The name for the suspensionless pseudo-trot done in Western Pleasure style is “wog” (i.e., perceptively a cross between walk and jog), and its equivalent at canter is the “jope,” which is a cross between jog and lope (Figures 1b, 3 and 10). The jope is often called a “four beat canter” and musical notation shows that to be true. However, the jope has four sounded beats and zero, or close to zero suspension. It is a waddling, lumbering, forehand-heavy pseudo-canter that has the same footfall order as a walk: Left hind, left fore, right hind, right fore. This is because in a jope, the diagonal pair has become decoupled in such a manner that the forelimb of (what would have been) the coupled diagonal lands earlier than its mate behind. Thus, the horse rolls through one, two, three, four-sounded beats that are in the wrong order for a canter.

Figure 11: Conformation counts in the canter as everywhere else. A, weedy and insubstantial, with a long back and calf knees; this combination does not bode well for long-term soundness. B, crooked hind limbs (“camped out behind”). This configuration makes it more difficult for the horse to get its hind limbs up under the body. C, massiveness. Nothing can be done to fix this except to choose a horse of a size more appropriate for riding use next time. Note, however, that this animal is producing a correct canter. D, downhill overall body balance. Good training can compensate, allowing correct cadence, as this horse is producing. Images: Dr. Deb Bennett
Some horses come into the game with conformation that makes it difficult for them to cantering correctly (Figure 11). Massiveness, downhill overall body balance, crooked hind limbs and weediness or lack of “bone substance” are problematic, although note that examples in Figures 10c and 10d are both cantering with correct cadence/footfall timing. But it takes more effort for them to do this than it does a correctly conformed horse, and it also takes more time, effort and knowledge on the part of the trainer. We must note, however, that few horses that compete in Western pleasure, not to mention few in the hands of amateur owners, suffer these disadvantages. The problems instead come from the rider’s or trainer’s misunderstanding that collection equates to going slowly, with a low head and a vertical face — never mind what he’s doing at the lumbo-sacral joint or with the hind limbs.
In many cases, training the horse to “wog” and “jope” — in other words, to take abnormally short steps and make an abnormally small effort with the muscles of the haunch — is done by continually rapping it in the mouth with the bit and/or by use of running martingales, draw reins or head-setting devices whose cumulative effect is to teach the horse not to go freely forward. This causes the animal to breathe more shallowly than normal and not in time with the swing of its hind limbs and, over time, it also tends to cause the horse’s spine to become stiff (note that the diaphragm is a muscle of the axial body).
Beyond these deleterious effects, the horse that waddles along at a “jope” with its body cast downhill from rear to front, is unlikely to be handy. That’s another topic we’ll be covering in our next installment, because only horses that anchor and push from behind — those that produce a true, suspended, and properly-cadenced canter — are capable of rollbacks, pirouettes or deep-in-the-ground cutting maneuvers.
Striking Off: The Graduation Exam
When students are studying in any of the prestigious musical academies of the world, endeavoring to become a professional on, for example, the violin, flute or piano, they are usually asked to master a “test piece” before they can graduate. This is a kind of final exam, usually difficult, in which the successful candidate will, among other things, demonstrate technical mastery of their instrument. By analogy, the instrument “played” by the rider is the horse, and I tell my students that I hope that they will strive to perfect the following “graduation” exercise, which is both a test and (if successful) proof they are no longer beginners. Here is the test.
- Have the horse at a lively but quietly attentive walk.
- Declare to me which lead of the canter they intend to strike out on — they must specify either the right lead or the left lead.
- Strike off into the canter directly from the walk, on the lead specified, with no perceptible movement of the rider’s legs, no jerking her upper body forward, no spurring, no whipping, no clucking, no voice commands and no dust raised. The idea is that the horse shall lift itself directly from a quality walk into a quality canter on the lead specified.
- Then the student has to come back and do the test again, specifying the opposite lead.
Many riders, when I first meet them, blush and demur over this and declare that it’s impossible. That’s because they’ve spent their whole previous riding life thinking of the canter as a gear, like third gear on a motorcycle. But the canter is nothing like a gear, and neither are any of the other gaits — the walk is not “first gear” and the trot is not “second gear.” Picturing it this way gets the rider nowhere, because it inevitably makes them think a canter is faster than a trot and a trot faster than a walk. But it is not so and I would show them this on my own horse (same horse seen in Figure 8), who if I asked this of him would canter at 4 mph, slower than he could walk — and this without loss of cadence, without short-stepping behind, with his haunches lowered, his loins coiled, his tail quiet and his forehand lifted from the base of the neck. This is true collection.
The rider who thinks of canter as “third gear” typically attempts the canter by running the horse into it. She’ll speed it up, going from a walk into an increasingly faster trot until it has no choice but to either canter or fall down. She will tilt her body forward, take her outside seatbone or both seatbones off the saddle, throw the reins to the horse and cluck to it, spur it, smack it with a whip or crop, and in sum, raise a lot of dust while still (at least half the time) not getting the lead she had intended — or worse, always getting the same lead (the lead the horse prefers). Such riders are demonstrating they know nothing about the biomechanics of canter as we have taught them in the previous paragraphs.
The rider who is attempting to learn how to do canter departs needs to realize that departure from a walk (or halt or trot) directly into a canter involves two things that must be taught separately, before trying to canter. They are the following.
Skill 1. The horse must raise “the life in its body” — i.e., its energy output — willingly, promptly and smoothly, and be prepared to do this on short notice, at any possible moment, whenever the rider may ask. This involves improving the horse’s ability to focus and attend (thus increasing its confidence and relaxation), as much as it involves any physical skills on either the rider’s or horse’s part. I probably don’t need to mention that thousands of horses do not know how to be responsive and/or have deeper problems in that they are not confident and therefore not willing. These horses are not “resistant;” they are ignorant — something that is to be changed by listening and learning, not by the administration of punishment.
Skill 2. The horse must learn to shift its weight at the rider’s request from being equally distributed on the left and right pairs of legs, to more heavily weighting the left pair of legs, assuming the rider intends to have the horse strike off on a right lead (Figures 5 and 6). Check the Resources at the end of this article for instructional materials that clearly explain how to train both Skill 1 and Skill 2.
Riders who have worked with their horse to master Skills 1 and 2 can then put them together. To strike off into a canter on a lead that has been specified ahead of time, the rider first asks the horse to put more weight onto its outside hind leg, to anchor it. Then, while it’s weighting this limb, the rider asks the horse to raise the life in its body. Throughout, the rider must sit in the saddle, and must glue (not more heavily weight but adhere) her outside seatbone to the saddle so nothing can make it come out of contact with the leather (and therefore out of contact with the horse’s outside hind limb). We are asking the horse to anchor its outside hind limb; the rider must also anchor their outside seatbone.

Figure 12: What the horse does during the canter strike-off, as seen from the side: He slightly shortens the step of the anchoring hind limb, but that’s the least important thing to note. Of major importance is that he shifts weight into the anchoring (grey) hind limb, and this can be felt by the rider as the animal “rolls over” the top (orange arrow). At the same time, he flexes the lumbo-sacral joint (uppermost red dot), which causes the pelvic angle to steepen from its position at the walk (blue line). This, in turn, causes the hip socket to move downward, “squashing” the stifle and hock joints into greater flexion. This is what “lowering the haunches” means. Once the hind joints of the anchoring hind limb are flexed, the horse can push down against the ground with the muscles of that limb and thereby lift the other three legs, as well as the fore part of the body (image after Waldemar Seunig “Horsemanship”, 1947).
After that, cantering becomes simple and beautiful, because once the strike off has occurred, every subsequent stride of canter is a ditto of the strike off. All the rider has to do to enjoy the elastic, floating feeling of cantering is to “go along with the horse,” keeping their outside seatbone glued down, but following with their waist and hips the natural roll of its back (Figure 12) and the advancement of the inside shoulder and haunch.
Resources
- Learning to time your aids, help on getting leads: eclectichorseman.com/mercantile. Select prerecorded April 2026 Eclectic Classroom/Zoom class “Rollback and Spin.” 2-hour video program $25.
- Training Skill 1 and Skill 2 for canter – equinestudies.org/bookstore. Select audio recordings “Mannering Your Horse” and “Birdie Basics.” Each 2-hour audio talk $25.
- Recommended reading for mindfulness training and greater awareness of your body when in the saddle: Eckhart Tolle’s “The Power of Now.”


