Farrier Takeaways
You should always expect an obstacle when rebuilding hoof wall.
Wearing two sets of gloves allows you to have another clean set ready after applying the first layer of acrylic.
Slow-set acrylic increases your window of opportunity for successfully rebuilding hoof wall.
A lower RPM Dremel tool allows greater control and is safer in the event that the horse moves.
Rebuilding hoof wall is no small task. There are a number of things that can, and often do, happen to make the job even tougher than it already is.
“When you do this work, it’s never going to be smooth,” says Smithtown, N.Y., farrier Gary Werner. “There’s always going to be an obstacle in your way.”
The good news is that while there will always be glitches and setbacks, you will reach a comfort level —
provided you invest the time.
“Once you do it, it’s like playing an instrument,” he says. “You feel cumbersome at first, but the more you do it, the more comfortable you’ll feel.”
Be Prepared
The key to limiting the glitches and setbacks is planning.
“It really doesn’t become intimidating,” Werner says. “The whole thing is preparation.”
There are a number of factors to bear in mind before rebuilding a hoof wall that will put you in a good position to succeed.
Hand, eye and ear protection. These are all important to avoid potentially serious injuries and health problems.
“When we do this work, we always should use hand, eye and ear protection,” he says. “Sometimes I even put ear protection in the horse because of the Dremel tool.”
A fan is an important tool to circulate fumes away from the work area. Of course, gloves are a necessity.
“It’s very important to use a Nitrile glove or a rubber glove,” Werner says, noting it’s difficult to remove acrylic from your skin. “If you’re not ambidextrous with acrylics, you’re better off using a Nitrile glove. If you can use both hands effectively, then you can use a rubber glove. We put two layers of gloves on so when we do one layer of preparation, we can pull the other one off and have another clean one ready to go.”
Acrylic choice. To maximize your window of opportunity, he suggests using a slow-set acrylic.
“The reason why we use slow-set is that once we do the work,” he says, “we can wiggle it around a little bit.”
Be mindful of the outdoor temperature when applying acrylic. It will affect set time.
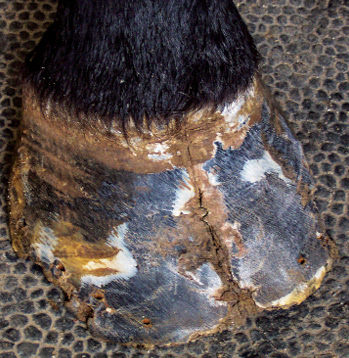
| Before | After |
 |
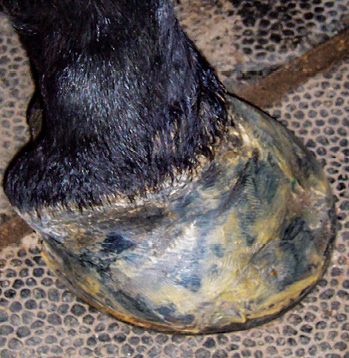 |
| Using a slow-set acrylic was helpful to Gary Werner when rebuilding this horse’s hoof wall. While it had a dorsal hoof crack, the foot was imbalanced, causing the horse discomfort. | |
“If it’s very warm, your window of opportunity is lower,” he says. “If it’s very cold out, your window of opportunity is very high.”
Slow-set acrylic is also helpful when dealing with a horse that might be uncomfortable or have an attitude problem.
“If you don’t know the disposition of the animal,” Werner says, “it’s beneficial to have your window of opportunity increased, rather than shortened.”
Werner recalls a horse with a dorsal hoof crack that was particularly difficult to work on.
“The foot was totally imbalanced,” he says. “I mean, it was hurting. The first thing we tried was to reestablish symmetry in the foot. We tried to unload what was loaded. If we unloaded what was loaded and we kept doing this, eventually we’d get to the point of symmetry.”
Werner and his son Jesse had to try rebuilding the hoof wall twice.
The worst thing you can do is get acrylic onto that coronary band …
“This horse was miserable to work on,” he says. “That’s why you need to have that slow-set acrylic. If a horse is really bad, you could do all this work and there’s one outburst and you’re done.”
Acrylics create heat and heat applied to the equine hoof doesn’t end well.
“The higher the volume of material, the higher the temperature and the quicker it sets,” Werner says. “You’re talking about maybe 180 degrees, as far as putting it on for a large patch. A small patch will be 140 to 160 degrees.”
When applying cuffs, those consisting of polyester Vectran will be about 115 degrees.
“The reason why it’s low is the material doesn’t absorb moisture into the fibers,” he says. “So, if I need a large patch and I’m skeptical about how far I am to sensitive tissue, I automatically use the polyester because it’s really like a heat shield.”
Play-Doh. The child’s toy is an essential tool to employ as a retaining wall when using acrylics.
“When you use acrylic, you’re going to put nails through that foot afterward,” Werner explains. “If you don’t cover that crease with Play-Doh and your acrylic gets on top of that crease, that is rough. I’m telling you, you’ll bend more nails trying to put that nail in. I hate to say, I’ve done that more than one time.”
It also can be used to protect the foot.
“You can stick the Play-Doh on the bottom of the sole and push it in,” he says. “Now, when I put the acrylic on the lateral side, it’s not going to interfere by migrating underneath the sole, which can make the horse sole sore. At the same time, it creates a dam.”
Impression material. As most know, impression material is an important tool.
“If we have a large void and I want to fill the sole, I use impression material,” Werner says. “I can impregnate it with crushed copper sulfate if needed. If I feel like I’m very close to sensitive tissue, we will pack it up against the wall. This way I’ll have an antimicrobial/antibacterial against that area. It’s also a heat resin that deletes transfer of heat into the sensitive wall itself.”
Composite material. Werner uses polymeric or polyester Vectran while patching.
“We use composite material and we’ll use either shredded fiberglass when we put it into a plastic cup,” he says. “Or for large patches, we’ll use polyester, which can be cut with scissors.”
He highly discourages shredding polyester or polyester Vectran, though.
“I’ve tried that and it doesn’t work,” Werner says. “What happens is you have all these fibers sticking out of the foot. The integrity of it and the matrix is excellent, but it looks like a bad haircut.”
When using composite material, drying times should be taken into consideration. Some repairs might take longer than you might imagine.
“If you have a 1/4-inch repair, as far as thickness, and it has a longer linear run, the drying time is actually higher due to the volume of material you use as compared to a 1-or 2-ounce repair,” he says. “Due to the volume of material I’m using, the heat exchange will be higher. Therefore, larger patches will dry quicker than a thinner patch.”
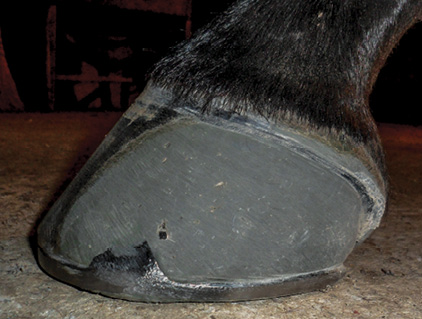 |
| Werner uses polymeric or polyester Vectran as composite material while patching. He cuts the material in strips with scissors and cautions against shredding it by hand. |
Sanding blocks and wire brush. A clean hoof wall is critical.
“You want to take any contaminants off the hoof wall to be assured that it’s always very clean,” Werner says. “If there are any oils or anything of that nature, the adhesion factor will be diminished completely. What we’ll normally tell clients is to use denatured alcohol. It’s very quick drying and very clean.”
Vet wrap and tape. Acrylic on the coronary band or skin is bad news. Vet wrap and tape are excellent tools to help avoid this.
“The worst thing you can do is get acrylic onto that coronary band,” he says. “The adhesion factor is just incredible and it will irritate skin. You can use electrical tape around the coronary band and then use the vet wrap as high as you think you need to.”
As you get more experience, you’ll use less.
“As you become ambidextrous, you don’t need as much vet wrap and tape, he says. “I still tape the coronary band, but we don’t really use vet wrap because we’ve just gotten proficient with it.”
Shrink wrap. An essential tool is a roll of shrink wrap.
“When we see failures, it’s because they just use acrylic out of the tube,” Werner says. “Depression and compression loads will cause the material to pop right out.”
There’s another benefit to shrink wrap as well.
“Once you mix the acrylic and you put it on,” he says, “the shrink wrap keeps your hands clean.”
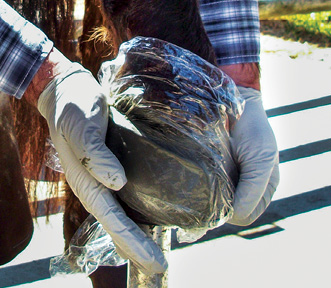 |
| Applying shrink wrap will keep the material from popping off of the foot. It also allows you to see the materials as you sculpt it to the foot. |
After it’s wrapped around the hoof, it allows you to see the material to mold it.
“When we do our work, we’re really sculptors,” Werner says. “You’re really using your visualization as to what you think that foot should look like or how you want it to look.”
Dremel. A Dremel is essential to the job, but Werner suggests a smaller tool.
“I know there are larger tools, but for me a smaller Dremel tool is safer,” he says. “If I go in there with a big, manly tool, I just feel like something could go awry. If the horse moves quickly or budges, I’m in trouble.”
While he uses various types of bits, he avoids those with sharp features.
“I want to venture into the work somewhat slow and carefully,” Werner says.
It’s important to slowly introduce the Dremel to the horse, as well.
“I’ll put the Dremel tool on and usually hang it on the wall or put it on the floor,” he explains. “I start the motor up on a low RPM and I’ll raise it up. Then, within 15 minutes, I introduce it to the horse. If it’s a good horse, I’ll introduce it in 5 minutes.”
Making A Commitment
Before you start rebuilding a hoof wall, be sure you know you can handle it.
“Once you start, there’s no turning around,” Werner says. “Don’t make a commitment to something where you back yourself into a corner. If you feel comfortable doing it and have confidence in yourself that you’ll be able to pull it off, then that’s one thing. But, if you don’t feel that it’s right and your intuition tells you no, then don’t do it.”
Once you make the commitment, make it easier on yourself and avoid these common mistakes.
“Some will do acrylic work with any kind of matrix, which is the composite material,” he says. “Another is they try to do it with the foot free standing. They put it on, let it dry while they’re holding the foot up and then they try to put a shoe on. It’s far easier to debride first, then we trim it and put on a shoe. We do almost 90% of our work with the shoe applied.”
Keeping these tips in mind will help reduce the obstacles that you’ll encounter while rebuilding hoof walls.


