Pictured Above: Sponsored by Victory, this forging exercise requires making a fullered mule shoe with calks and a brazed-on toe bar. You have until Jan. 20, 2017, to mail your entry into the AFJ office. Read instructions on how to enter at the end of the article.
Now in its third year, the Summit Mail-In Forging Exercise has a new challenge for this go around. The inaugural contest was a hammer-finished heart bar shoe, followed the next year by an aluminum shoe with a riveted bar made out of a rasp. The bar shoe exercise allowed for power tool application. Although using power tools is a fine way to make and modify shoes on an everyday basis, I want contestants to hammer-finish this year’s shoe again. After all, this exercise is about learning and practicing the necessary skills to be a well-balanced farrier. This year’s Mail-In shoe is a fullered mule shoe, double heel calks and a brazed-on toe bar for the left front foot.
Mules tend to get a bit of a bad rap from farriers. I admit there was a time that I didn’t care much for shoeing them. Their personalities tend to be only part of the problem for farriers. Their feet often present the bigger challenge. Although there likely isn’t enough of these equids to fill your books, learning how to shoe them is a good skill to have. I will be doing a presentation at this year’s International Hoof-Care Summit on footcare for mules, so building this shoe will help if you plan on attending this class.
I think a farrier must accept that a mule has a certain shape to its foot, and then must shape or make the shoe accordingly. It has a different shape than a normal front or hind horse foot, and once you determine to make that shape, you will end up having a lot more success shoeing mules. They also tend to have a much thicker wall than a horse, so a common keg shoe for horses does not put the nails in the white line like a well-punched handmade mule shoe will. With that in mind, here is an article about how to make a mule shoe.
Edgewood, N.M., farrier and World Championship Blacksmiths founder Craig Trnka will be the judge for this exercise.
Building The Shoe
I started with 12 inches of 3/8-inch by 3/4-inch bar stock (Figure 1). I put a slight bump in the toe, but with a toe bar, this is not necessary to the application of the shoe on the foot of a mule (Figure 2). The toe bend on a mule shoe is not really a front and not really a hind toe bend. Make your toe bend by hitting the middle of the stock with the round side of your hammer
(Figure 3) and seat it out like I am doing in Figure 4. Notice that I am hammering over my tongs to hit the inside of the shoe with the flat side of my hammer. This is a very important step because the stock will have become thicker on the inside edge. Once the toe is seated out, set the toe on the horn as in Figure 5. This is for a left foot, so make the right side slightly longer than the left side.
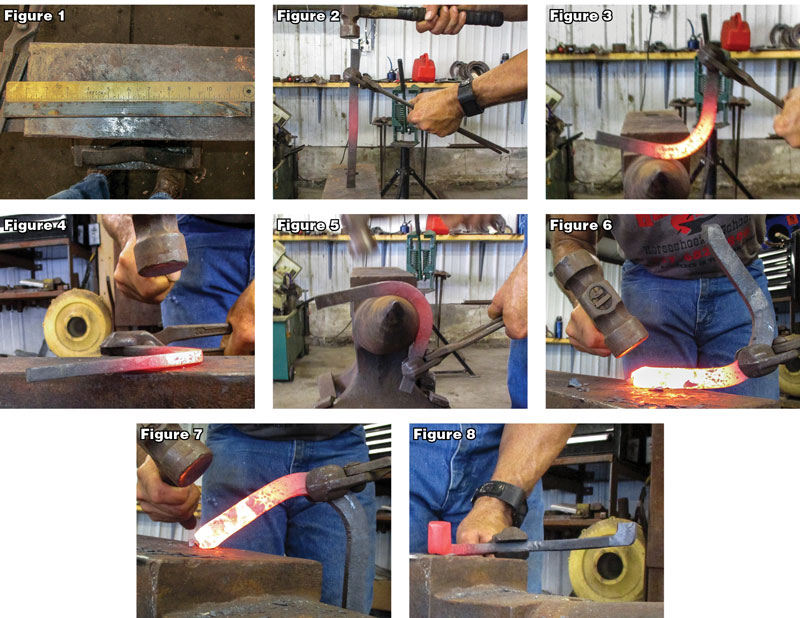
Next, making heel calks has a lot to do with rhythm. If you hit the stock with similar hammer blows delivered from similar positions, you can make the heel calks come out much more symmetrical. You can find links to my videos on making heel calks at americanfarriers.com/0916. The main positions for forging the calk are depicted in Figures 6-10.
Begin by bending about an inch of material over the edge of the anvil toward the ground surface of the shoe. Hold the shoe so that the heel calk is pointed away from you as in Figure 6, then back toward you as in Figure 7, and then pointing up as in Figure 8. Control it as you bump it into shape, and take out any bend as in Figures 9 and 10.
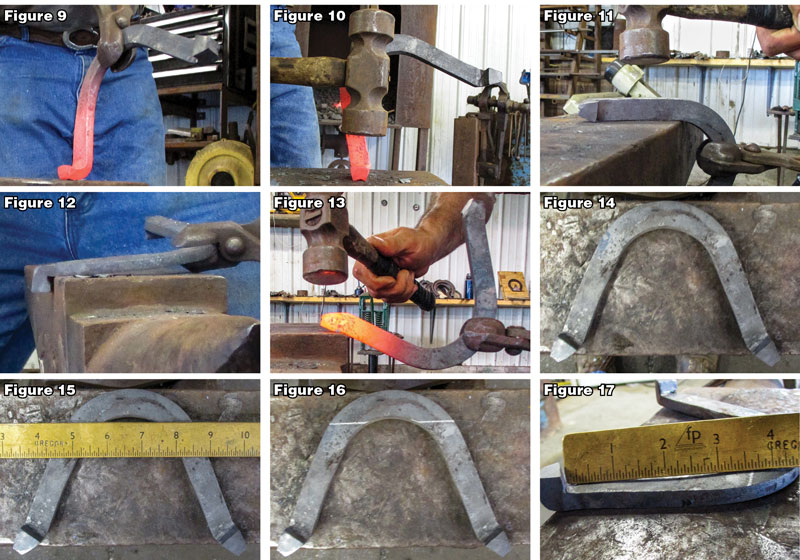
You also will notice that I am turning the heel calk on the branch as I build it so that it will turn out slightly when it is done like a mule foot does. When it is 90% finished, run the stock down slightly (Figure 11) and then clean up the calk over the edge of the anvil as in Figure 12. If the calk is not turned as much as you want, you can bend the heel calk out more over a soft edge on the face of the anvil like Figure 13, or do it over the horn.
Repeat the process on the inside branch, and you should end up with something that resembles Figure 14. Since there is going to be a brazed-on toe bar, mark back farther from the toe than you might if you were not going to have the toe bar (Figures 15 and 16). This is the start of your fullering. At this point, the start on the lateral side is about 3 5/8 inch (Figure 17) from the front of the heel calk. The medial side was closer to 3 3/8 inch.
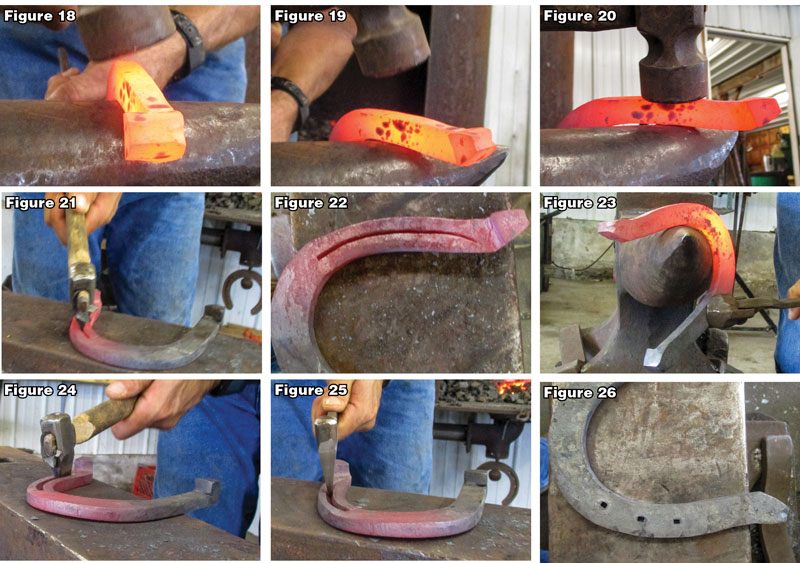
Hem the branch on the horn, which means pinching it up on the ground surface like you see in Figures 18-20. Notice in Figure 18 that my hammer is turned in my hand to hit with an angled face. I then stay on my horn and hem all the way through the branch before marking my crease (Figure 21). Since the mule shoe will have a straight branch, and we like to have more curved branches because we are horseshoers, I like to make my crease curl in at the end of the crease to make the shoe look a little bit rounder (Figure 22).
Heat the branch and bend it around the horn (Figure 23). Fuller (Figure 24) and punch the branch (Figure 25), and you should end up with half the shoe done as in Figure 26. Notice that the holes are coarser than they would be on a similar sized shoe made for a horse. Figures 27 and 28 are hemming and turning the inside branch, and in Figure 29, I am turning the heel calk out on the horn a little bit more than it was. Mark the fullering (Figure 30), and your shoe should appear similar to Figure 31. Finish this branch like the first, and then put your final shape on the shoe. The last part of that is to make my heel calks turn out at just the right angles as in Figure 32.
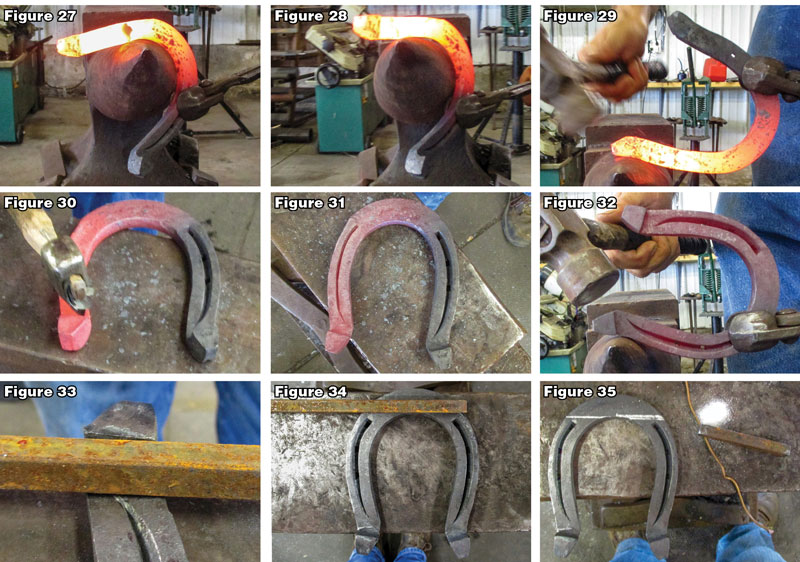
We are now ready to cut and braze the toe bar. Brazing is all about the set up. Have the shoe and toe bar flat and clean. As a general rule, a heel calk should be as tall as the parent stock was thick. We are making this shoe out of 3/8-inch stock, so we are going to make the toe bar out of 3/8-inch square stock. In Figure 33, the square stock is being placed in front of the heel calk so that it can be compared to the size of the calk. Draw a line across the toe and place the bar to determine how much to cut (Figure 34). This shoe is hammer finished, so cut the bar with a hacksaw instead of a chisel or hot cut.
To braze, you will need the things shown in Figure 35: the shoe, toe bar, some Borax and copper wire. I really like Red Mountain Flux for this type of work, although I didn’t use it for this demonstration. I brazed the first one in the coke fire. You can see it in position in Figure 36, and again in Figure 37 in which I have placed a shovel over it to deflect heat from the fire to help melt the copper. Once I brought it out and scraped the hoof surface of the shoe off on the edge of the anvil, I saw that the bar had slipped slightly to one side (Figure 38). I took this as a sign that I should demonstrate putting it on in a gas fire, so we went out to one of the rigs to braze in gas.
I broke off the grab and cleaned it up. Then I put a little flux on the pieces and smashed the copper wire down so it became thinner (Figure 39). Once the forge was ready, I carefully placed the bar in position, and gently put it in the forge where it could sit level.

In Figure 40, the piece is being heated in the forge, and once it melted, we turned off the forge and brought the shoe out with a steady hand. You can see that the copper is still molten.
Put the shoe on the anvil and push down on the bar with your hammer until the copper cools so that it is no longer liquid (Figure 41). You are going to have copper in a lot of places, so drag the hoof surface of the shoe across the edge of the anvil to scrape off some of the scale, flux and copper that will be there from the brazing process (Figure 42).
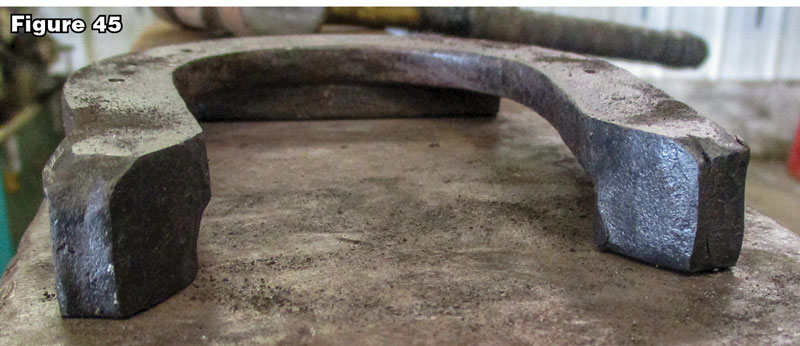
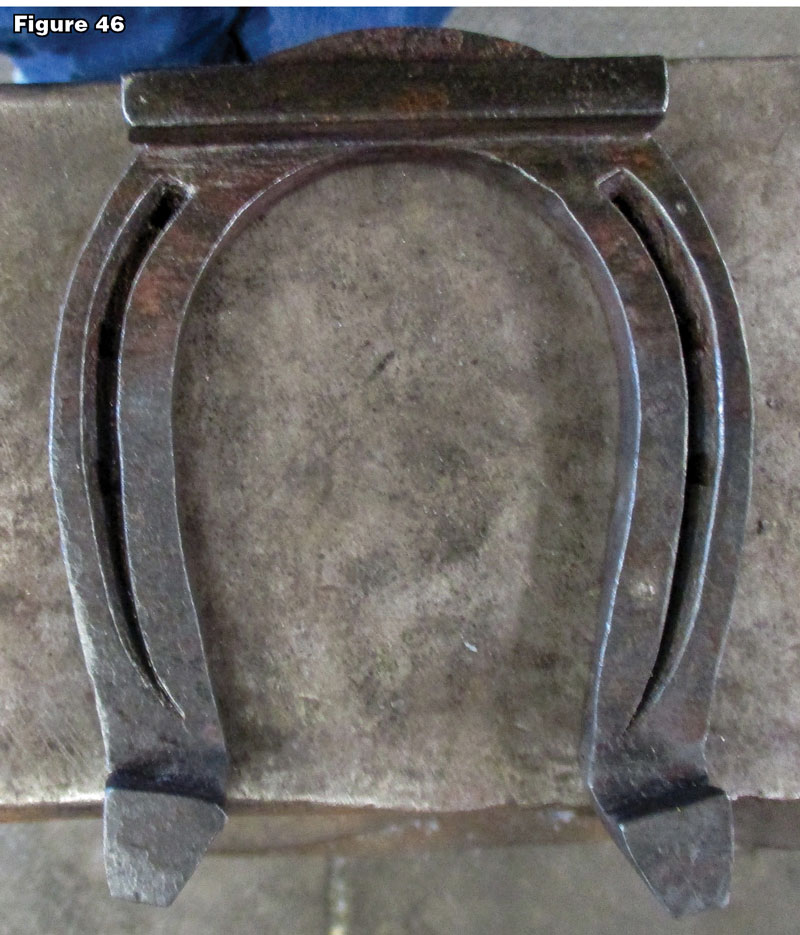
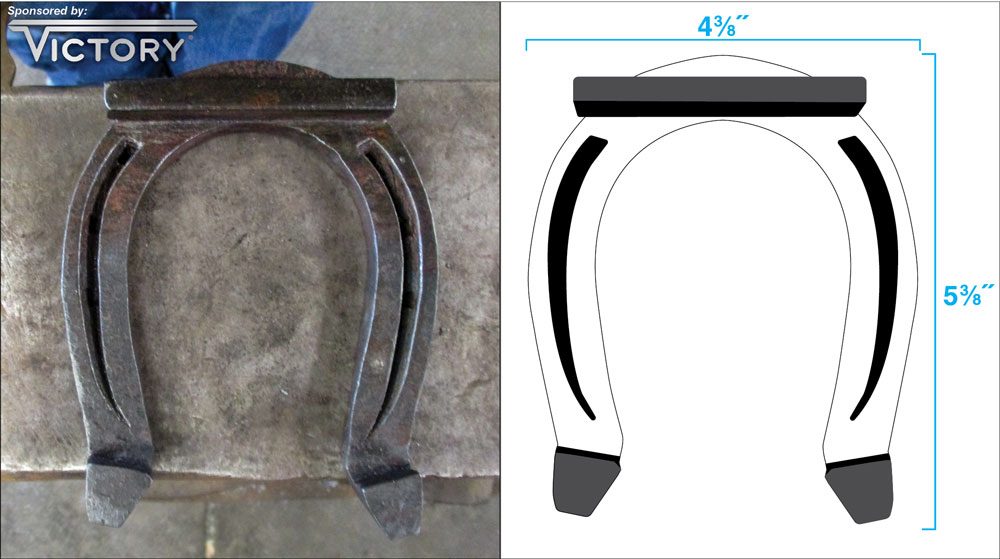
All that is left is brushing. If you do have anything remaining to do that requires heat, don’t heat the shoe to the point that you lose the toe grab. You can see that the shoe is just under 43/8-inch wide, and 5 3/8-inch long (Figures 43 and 44). The bar should sit flat on the anvil when the shoe is placed with the hoof surface down (Figure 45). Figure 46 shows the finished product.
This challenge features good, solid basic skills that will be enjoyable to polish. Take the challenge of this year’s Summit Mail-In Exercise and build a mule shoe. Good luck!
How to Enter
Step 1: Make the shoe as described by Chris Gregory.
Step 2: Obtain and complete the entry form at americanfarriers.com/summitshoe. If you are unable to download the form, contact American Farriers Journal at 262-782-4480 to request a form to be sent in the mail.
Step 3: Send in the completed form and your shoe.
If you won’t attend the IHCS: Mail this entry form and your heart bar shoe to
American Farriers Journal
Summit Mail-In Forging Exercise
16655 W. Wisconsin Ave.
Brookfield, WI 53045.
Your entry must be received by Jan. 20, 2017.
If you are entering from outside the U.S., DO NOT assign a value to your shoe on the customs declaration form.
If you are attending the IHCS: Drop off your entry form and heart bar shoe in the Duke Energy Center near the IHCS registration by
5 p.m., Jan. 24, 2017.
Step 4: Each contestant will receive a free commemorative T-shirt. The top finisher will earn a belt buckle and 2018 IHCS registration.
T-shirts will be mailed by March 1, 2017, and immediately given to those submitting a shoe at the Summit. All shoes not picked up at the IHCS will not be returned.




Post a comment
Report Abusive Comment