To say that the equine hoof wall is an amazing structure is a gross understatement. It must withstand a multitude of destructive forces from the environment — both man made and natural — and extreme concussive forces trying to tear it apart. Given these circumstances, it’s no wonder that failures occur.
As farriers, we know the equine hoof wall is composed of keratin. It’s produced by papillae at the coronary band forming tubules that are “bonded” together, which gives them amazing vertical strength, yet maintains flexibility.
Unfortunately, some horses do not get a piece of the genetic lottery and are born with less-than-stellar wall thickness and strength. While a thick hoof wall has a better chance of remaining crack free, it’s no guarantee against wall failure.
Wall failure doesn’t usually just happen. Cracks can be caused by a number of factors including neglect, an alternately wet-dry environment, traumatic injury, infections, poor hoof wall quality, poor horseshoeing and twisting of the hoof capsule.
Cracks occur when there is separation of the tubules, often resulting in acute pain. The result is that now there is movement on both sides of the crack constantly irritating the papillae that produce healthy tubules and preventing formation of healthy horn. Consequently, the primary repair methods require stabilizing the wall on either side of the crack and preventing movement at the coronary band.
FARRIER TAKEAWAYS
Creating a drain channel is crucial to avoid sealing bacteria under a patch.
Repairing a toe crack when the foot isn’t bearing weight is important to avoid pinching.
Take great care when drilling holes for lacing cracks because of the potential for entering the sensitive foot.
Proceeding slowly with hoof wall cracks is advisable to avoid complications.
There are several ways of going about this, each have advantages and disadvantages, which will be addressed in this article.
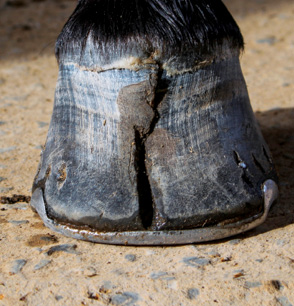
When repairing a toe crack, a frog support shoe is recommended to stabilize the coffin bone and reduce pinching.
Follow Fundamentals
As we explore the world of hoof crack repair, there are several methods that work. It’s important to keep in mind when exploring alternative methods that new products have come on the market in the past few years, so some literature on crack repair might be outdated and not used much anymore.
Whatever method you choose to use is doomed to fail unless these
fundamental principles are followed.
It’s critical that you never seal bacteria under a patch. Bacteria can be the lurking hidden monster under the hoof wall just waiting to propagate. The result can be a massive infection possibly leading to osteomyelitis of the coffin bone and subsequent loss of the horse.
This point cannot be stressed enough. If you are using acrylics and are unsure that the crack is completely dry, make a drain channel and irrigate the crack until it has cornified and is growing down.
The drain channel has to be filled with something to prevent the acrylic from filling in the channel.
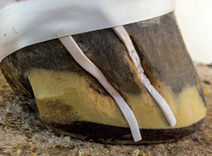
When using acrylics, it is crucial to use drain channels to irrigate the crack until it has cornified and is growing down the hoof.
Play-Doh can be used, but can be difficult to fully remove. I have used a strip of blue foam board from Vettec, which is easily dissolved with methyl ethyl ketone.
Rubber surgical tubing is another option. Wellington, Fla., farrier Curtis Burns, who has extensive experience repairing cracks on racehorses, has discovered a foam rubber material with adhesive backing that he uses to fill the channel. The ends are left exposed and can be removed by pulling on the end.
When using acrylics, it’s vitally important to have the wall clean and dry. Failure to have a properly prepared wall will result in premature adhesion failure.
Healing the crack at the coronary band is dependent on stabilizing the wall on both sides of the crack. Whatever method you use is dependent on a patch that is strong enough and large enough to immobilize the wall and both sides of the crack.
Sand Cracks
Mainly a cosmetic concern, sand cracks do not qualify as severe cracks. Minimal work is necessary to deal with these.
Never seal bacteria
under a patch …
Sand cracks usually occur in multiples and generally are all around the foot. The usual cause is neglect when the horse is turned out on pasture for an extended period of time with little or no hoof care. The alternating wet-dry conditions that are caused by dew on the grass at night is the major contributing factor.
Generally, the cracks are no deeper than 1/16 to 1/8 of an inch deep and are more of an aesthetic concern than a soundness issue. The best method is to attend to the foot on a regular basis.
In many cases, the situation involves a horse that has been acquired by a new owner, or the owner for whatever reason has neglected the horse.
The best way to approach this is to trim the foot, dress the wall, apply a shoe, open and clean out the cracks and fill with acrylic.
Figure 1 shows a before view of a summer polo pony that had been turned out for the winter with no footcare for months. When it finally was noticed, it had multiple sand cracks. In this case, the farrier shod the horse in Polyflex shoes, opened the cracks to the bottom, filled them with Equilox (Figure 2) and let the foot grow out (Figure 3).
Horizontal Cracks
Small horizontal cracks also do not fall into the severe category. Horizontal cracks usually start at the coronary band. They are generally caused by trauma to the coronary band from being stepped on or by the eruption of an abscess that exited near the top of the foot.
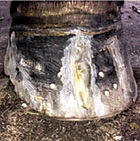
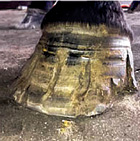
Figure 1
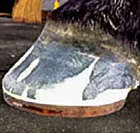
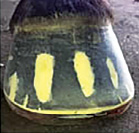
Figure 2
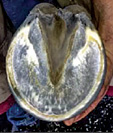
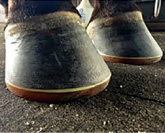
Figure 3
The crack is caused by the interruption of growth for a short period of time. Depending on the insult, the crack is usually 1/2 inch to 2 inches long. The longest one I ever saw extended from heel to heel.
The crack generally does not require any special attention and usually only becomes a problem when it has just about grown out. At that point, it’s common for the wall below it to become unstable and separate from the foot. Usually the laminae under it are well cornified and it can be left open or repaired with either acrylic or polymethyl methacrylate (PMMA) adhesives.
Toe Cracks
Most severe toe cracks are the result of neglect. They are seen in horses with little or no regular hoof care where the crack has gotten out of control with a full wall fracture.
You would think that pain would be caused when the crack is pulled apart, but this is not the case with toe cracks. When a horse has a toe crack, pain is experienced when the foot is weight bearing and the crack is pinched together at the top.
The repair plan is twofold. First, the application of a frog support shoe is recommended to stabilize the coffin bone and reduce the pinching action. Next, it’s necessary to keep the wall from opening and closing. This can be accomplished by a variety of techniques, such as plates with screws or acrylic repair.
With acrylic repair, it’s extremely important to install a drain that can be medicated with a mild antibacterial solution. The other important thing is to apply the repair material with the horse’s foot in the air. When suspended, the crack is in the open position and pinching will not occur.
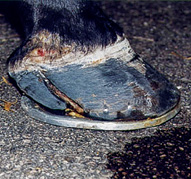
Figure 4
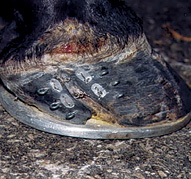
Figure 5
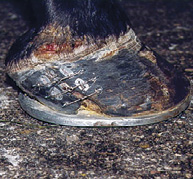
Figure 6
Quarter Cracks
Quarter cracks are generally seen in horses that work at speed such as racehorses, sport horses and long-footed horses. Quarter cracks occur in the quarters and can be bloody and painful. They can be caused by trauma, short shoeing, hard ground and poor conformation. The problem is compounded by the fact that the wall at this part of the foot is thin and pliant, so stabilization can be tricky.
Here are five options that are commonly used in handling quarter cracks.
Heel removal. Before the use of acrylics, a traditional method was to remove the wall from the crack to the heel, eliminating movement by removing one side.
Most severe toe cracks are
the result of neglect …
The wall removal option works, but it requires downtime while the exposed heel cornifies. A three-quarter shoe was often applied so no concussion occurred at the heel. However, I believe a straight bar shoe is a better option.
Plate and screws. Another option is the use of a metal plate secured with tiny screws. The plate usually is made of copper and bent to conform to the wall over the crack. They generally are 2 to 3 inches wide and about 1 inch high. Multiple 1/4-inch screws secure the plate to the foot. Extreme care with the screws is necessary because the chance is high of getting into sensitive foot.
Lacing and acrylics. Lacing with stainless steel wire has been practiced for decades, with a number of farriers specializing in it. After the crack has been open, cleaned and dried (Figure 4), holes are drilled perpendicular to the crack and wire laces run through (Figure 5). The ends are then twisted to engage the edges and pull them slightly together (Figure 6). Once that is accomplished, a patch (Figure 7) can be applied to protect the lacing. For very thin-walled horses, another option is to build a small column of PMMA on both sides of the crack. Instead of drilling into the wall, the wires can be pulled through the adhesive.
Lacing is an art that must be carefully practiced. Extreme care must be taken when drilling the holes to avoid drilling into the sensitive foot. Another potential concern is to avoid over-tightening the wires. If you over-tighten them, the papillae between the cracks can become compressed, resulting in pain or a seam can develop that can lead to subsequent cracking.
Aluminum or plastic patch with acrylics. When the PMMA adhesives came on the market, it was discovered that they bonded aluminum and plastic to the hoof wall very well.
Since then, it’s widely used for gluing on shoes and gluing aluminum patches over quarter cracks. The advantages of aluminum are that it’s readily available, lightweight and strong. It does require some skill in shaping and cleaning, but it’s easily learned.
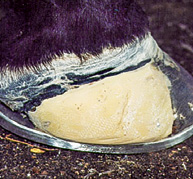
Figure 7
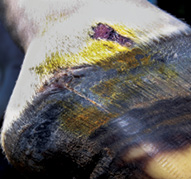
Figure 8
Synthetic cloth glued on with acrylics. Within the past few years, the discovery of fabrics with high-tensile strength has changed the face of crack repair. Fiberglass cloth had been tried, but the failure rate was high because of its lack of strength. This has all changed with the advent of the new “super fabrics.” Their strong suit is that they are very user friendly. They easily can be cut with industrial scissors and layered to provide even more strength.
Heel Cracks
Heel cracks are most common in Thoroughbred racehorses. They occur because of short shoeing and overreaching. They are challenging because there is not much heel behind the crack to work with. Burns has solved this problem using his patch material, which can completely wrap the heel.
Here’s a look at two cases involving heel cracks.
When not to patch. Gracie, a 7-year-old gray warmblood mare, was injured in a jumping class. The Grand Prix prospect inadvertently stepped on the lateral side of her right front foot with her right hind foot. The injury resulted in contusions and a small wound to the coronary band.
Four days after the injury, I accompanied Burns to examine the foot. Upon examination, the crack appeared to be of the garden-variety (Figure 8). However, Burns was cautious about patching until he was certain about what he was facing. He opened the crack to let it dry and the owner was instructed to keep it bandaged and medicated.
On day 10, Burns revisited the horse to find a much different situation. The crack had morphed into a pronounced separation on both sides (Figure 9). It extended about 3/4 of an inch on both sides. Burns carefully removed the loose wall to reveal a separation (Figure 10).
Florida Farrier Shares His Quarter Crack Patching Method


The first patch (left photo) must become tacky before smoothing it. After applying the second patch and clearing the drain channel, inject Thrush Off.
When repairing quarter cracks, Wellington, Fla., farrier Curtis Burns has devised a system that he calls the Polyflex Matrix patch kit.
The kit contains matrix cloth material, drain channel filler, a flushing syringe and tape. Polymethyl methacrylate (PMMA) adhesive, copper sulfate and tungsten carbide burrs are sold separately.
Before patching cracks using this method, Burns strongly suggests that you watch his video and seek experienced help.
Burns believes that some flexibility in a patch is good, as aluminum patches can be too rigid and some horses cannot tolerate them.
Addressing The Crack
Cracks can be caused by a variety of reasons, such as short shoeing, imbalances, injury, etc. Often, it’s best to re-shoe the horse before applying the patch.
Extreme care must be taken in opening a quarter crack down to the bottom of the crack. Good tools, a good light source and a cooperative horse are necessary for success. You want to open the crack down to sensitive tissue, but not invade it. This is very delicate work and should not be attempted unless all conditions are right.
Cleaning The Wall
Useful cleaning tools are a rotary drum sander and a 1/4-inch textured carbide burr on a Milwaukee rotary tool.
When the foot is completely clean, dry the wall using a butane torch. Do not use solvents.
Patch Application
Always use a drain channel. Burns prefers a soft, foam liner with adhesive on one side to fill the drain channel during the patching process. This is removed after the patching is completed.
Keep the drain channel filler as narrow as possible, but still functional.
Secure the top of the drain channel filler at the coronary band with tape to hold it in place during the patching.
Either fast- or slow-set PMMA adhesive will work. The choice depends on your experience with the adhesive and the ambient temperature.
The patch application is a two-part process. It consists of a base patch and an outer patch over it.
Cut the first patch material large enough to extend beyond the crack at least 1 1/2 inches on either side, depending on the size of the foot. Cut the patch material to be twice the length of the crack height because you will fold it at the top to provide added strength before you apply it.
When using slow-set PMMA from a 1-ounce container, add about 1/2 teaspoon of resin and mix it in thoroughly. Then add the accelerant and colorant.
Saturate the patch thoroughly and fold it over at the top. Wet the foot before applying the patch. Then apply the patch with the foot weight bearing. The first layer is going to be only about 1/16 inch thick.
Allow the first patch to dry without disturbing it. Do not put shrink wrap over the patch, as this may move the patch and weaken the bond. As the PMMA gets tacky, use your finger to carefully smooth it out.
When the first patch is dry, a larger patch is applied over the top, using the same technique.
Finishing
Remove the drain channel filler and inject Thrush Off from the top to bottom with a plastic tip syringe.
Have the client flush the drain channel daily with water using the bottom opening. This is to prevent irritation to the coronary band from rough handling. Thrush Off then can be carefully injected into the upper opening.
Use the rotary tool and drum sander to smooth and finish the patch.
Finally, coat the patch and surrounding wall with Super Glue. This will keep moisture from wicking under the patch and loosening it.
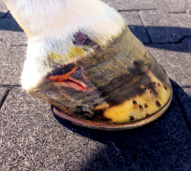
Figure 9
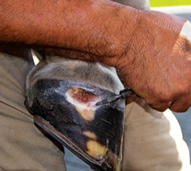
Figure 10

Figure 11
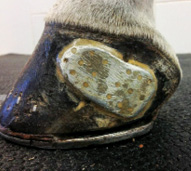
Figure 12
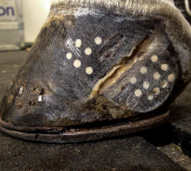
Figure 13
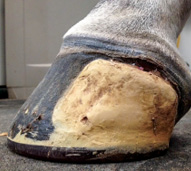
Figure 14
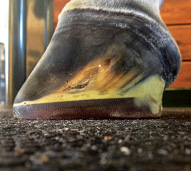
Figure 15
On day 14, I again accompanied Burns to look at the foot and photograph it. The skin and coronary band had healed nicely and the mare is back to light hacking.
On day 21, Burns examined the foot again. He applied a patch (Figure 11) after determining the mare needed stabilization. Throughout the process, she never took a bad step.
This case illustrates the need to proceed slowly with new cracks. If this had been initially patched over, there was a good chance of sealing bacteria in the cavity and creating a massive infection.
Patches gone bad. Prince was a high-level Grand Prix jumper with a troublesome quarter crack that was not responding to patching with an aluminum plate (Figure 12).
Holes were drilled into the hoof wall in an attempt to get better adhesion (Figure 13). This is a very dangerous practice and is not advised. It’s incredibly easy to lose control of the drill and get into the sensitive foot.
The other possible complication was applying a partial soft-pour directly under the crack. Prince remained unsound and unable to compete.
A second attempt was made with the aluminum patch using more acrylic with the same result. Prince still was unsound. A third attempt was made using an acrylic patch again with the same result.
Finally, Burns was brought in to help. His solution was to glue on a Polyflex shoe and use his patch procedure using his own materials (Figures 14). The result was a sound horse and return to competition (Figure 15).
We have never had so many options for repairing hoof wall cracks. It can be a daunting task for the novice to sort out the method he or she wants to try. As always, it’s wise to seek the voice of experience. While patching cracks can outwardly be seen as looking pretty safe, the possibility of disaster is very high unless you are extremely careful.




Post a comment
Report Abusive Comment