Takeaways
- Hall of Fame farrier Randy Luikart makes two sizes — one for trimming the hoof and the other for finishing the bottom.
- Avoid making the springs spark while working on them in the fire because they will burn and crystallize.
- After hardening the blades in oil, bake them for an hour at 460-475 degrees. Let them cool with the oven overnight.
I’ve made all my hoof knives throughout my 60-year career. When I started, you could buy a Frost knife from Sweden for less than $10. A full set of nailed-on shoes was $11, gas was 28 cents a gallon and my first new truck (1968 GMC Handi-van) was just barely over $2,000.
So, why did I make my own knives? I learned that skill from Lester Hollenback, who also made his own blades. That was a skill I would use throughout my career, so I wanted to master the process to the point of consistency and serviceability. Some will comment that there are a lot of quality and beautiful knives on the market; however, I like the utility of making my own.
I make them in two sizes, one slightly less than a half-inch wide and the other about 5/8-inch wide. Why the two blades? I use the heavier blade to open the hoof and after trimming, the smaller blade makes finishing the hoof bottom handier. That way you don’t dull your only sharp knife.
Source Material
The steel is from hay rake springs (Figure 1). You can buy them new or if you have a customer who makes their own hay, you can usually obtain some broken ones before they throw them in the trash. While handling the springs in the fire, do not let them spark as the springs will burn and crystallize.
FIGURE 1: Randy Luikart makes his hoof knives from hay rake springs. Images: Randy Luikart
Draw the steel to a flat bar longer than the blade length you will need. One blade is about 5/8-inch wide and the other is just about ½-inch wide and the thickness of the blade that will be in the handle. Remember not to spark the metal in the fire, work it evenly until you are satisfied with the dimensions of each size. Some people like a different blade length, so decide how long you like them to be and slightly draw that area down to about 80% of what you had. Leaving the blades on the stick for now, slightly bend the blade toward the side that will be the edge to about 15 degrees of plum (Figure 2).
FIGURE 2: Draw the steel into a flat bar that’s longer than the blade length needed. One blade is about 5/8-inch wide and the other is just about 1/2-inch wide and the thickness of the blade that will be in the handle.
Turn the blade over and set the edge down with the hammer on the backside of the knife. This will stretch the blade and straighten it back to plum if done correctly. Do not draw the blade to a sharp edge with the hammer; leave a little for grinding (Figure 3).
FIGURE 3: Don’t draw the blade to a sharp edge with the hammer; leave a little for grinding.
Creating the Hook
Putting the hook on the blade is accomplished by bending it slightly, not plum with the axis of the blade but slightly tilted toward the edge. This is to keep the hook from digging into the sole on its own while pulling the knife through (Figure 4).
FIGURE 4: Putting the hook on the blade is accomplished by Bending the material slightly, not plum with the axis of the blade but slightly tilted toward the edge, which achieves the hook.
FIGURE 5: Ensure the handle area is flat and the dimensions for the handle are appropriate before cutting it loose.
When you are satisfied with the shape of the blade and hook, heat it to get the arch in the blade that you want (Figure 5). Mark where the flat will go into the handle, heat that area and use a hot cut to cut the blade from the stock. Ensure the handle area is flat and the proper dimensions you would like to use before you cut it loose, as handling the blade free of the stick is difficult (Figure 6).
FIGURE 6: Ensure the handle area is flat and the dimensions for the handle are appropriate before cutting it loose.
The blade has hard and soft sections from its manufacture, so you will have to anneal the blade to drill it. To do that, heat the whole blade to light cherry and cool the whole blade in sand. This slows the cooling of the steel and removes the hardness slightly so you can drill it. Using a good bit (not the full size of the hole required unless you are going to pin them in). I use a 1/8 or 9/64 bit and follow with a 3/16 bit for the final hole. Use a drill that goes slowly (I use my battery drill) so the sharp edge will cut without getting hot, which causes the bit to cease cutting. Cutting oil helps.
Once you have the holes drilled, smooth any burrs left from the drilling. Once again, ensure the blade fits the handle and then you are ready to harden. I keep a tin can full of motor oil that is deep enough to submerge the entire blade for this purpose.
“Do not get the springs sparking in the fire, as they will burn and crystallize…”
Heat the blade so it’s cherry red. Remove it from the fire and quench it in the oil, stirring the oil with the blade so that any hot spots don’t occur. Wipe the blades with a rag to clean, taking care to avoid bending or prying the blade as it is hard, brittle and will snap if bent or stressed. Gently clean the scale off with a grinder, just shiny enough to get the blade to bare metal on most surfaces.
Baking Blades
I usually make several knives at one time, so when I have three or four of them, this last step is more efficient. After hardening in the oil, take the blades to your house, preheat the oven to 460-475 degrees. Put the knife blades in and bake them for an hour. Let them cool with the oven overnight. In the morning, you will have pretty, blue-colored blades that are slightly springy and hold an edge quite well (Figure 7).
FIGURE 7: After baking the blades for an hour at 460-475 degrees, turn it off and let them cool with the oven.
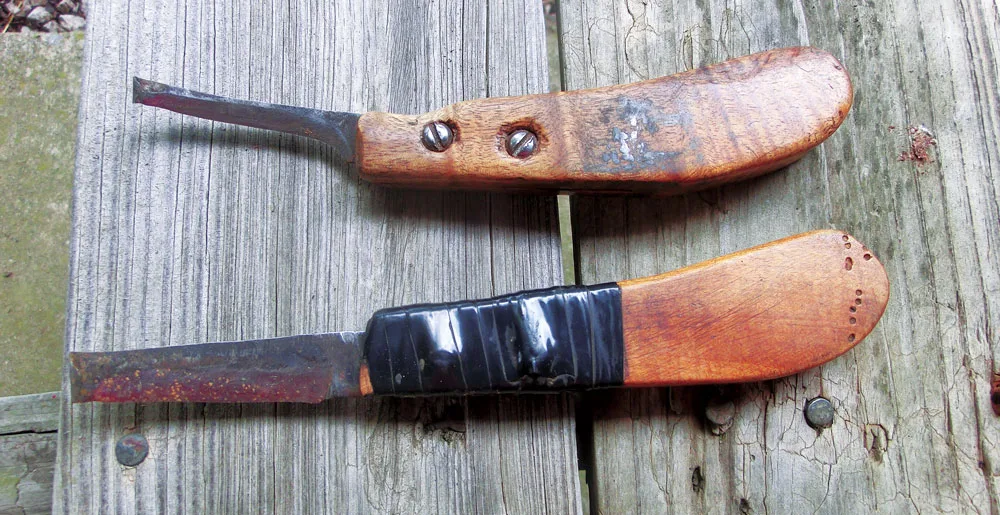
Attach the blades to your handles however you wish. I use 3/16 x 1-inch round head bolts and nuts and wrap them with electrical tape. If the blades happen to get loose, you can remove the tape, tighten the bolts and re-tape them (Figure 8). That also makes changing them in the handle easier when you finally wear out a blade. If you have a favorite handle or make your own, make the blades to fit the holes in those handles. When you make them in a batch, it becomes a nontraumatic event if you break a blade (unless you cut yourself in the process) while working. Simply unscrew the broken one, put in a new one, sharpen it and get back to work.
FIGURE 8: Luikart uses 3/16 x 1-inch round head bolts and nuts to attach the blades to the handles and wrap them with electrical tape. If the blades loosen, you can remove the tape, tighten the bolts and re-tape them.
Once you have the process down and are successful with this simple blade, you can make other blade styles similar to what’s available in today’s market if you desire.
Learn More
Gain more insight from Hall of Fame farrier Randy Luikart as he details how to finish a great pair of nail nippers here.