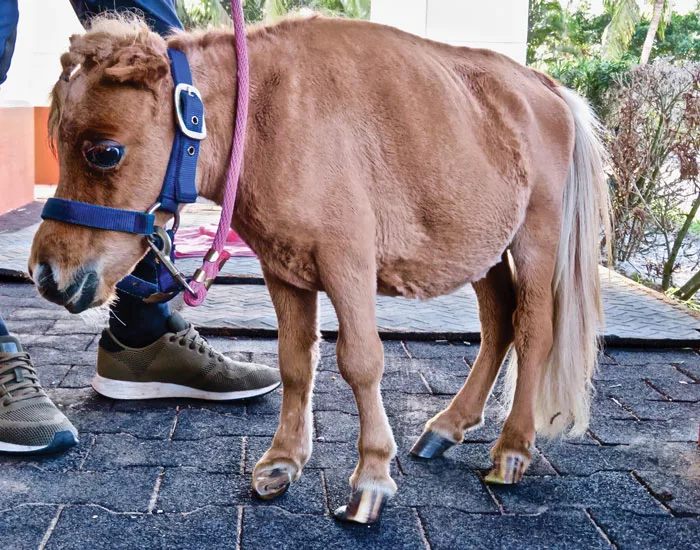
A new client calls and asks you to come out and look at a “pony” on the farm that has some problems. The day of the appointment comes and when you get to the farm, you find the animal in front of you is a miniature horse — and a dwarf, at that.

A miniature horse, like the name suggests, looks identical to a traditional horse but is smaller in stature. American Miniature Horse Association Registered horses stand at or below 34 inches, or 7-8 hands. Dwarfs are miniature horses with a genetic mutation — or combination of genetic mutations — that, depending on the severity, can result in a variety of deformities and related health issues that need to be addressed.

When working with dwarfs, farriers are faced with a unique set of challenges; but they also have a toolbox full of possible solutions that would not work for a traditional horse. One of the lessons I learned early on working with these animals is just how much can be done to help. With proper hoof care and horsemanship, many miniature horses and dwarfs can be quite successful.

Farrier Takeaways 

  • One of four genetic mutations can cause dwarfism in miniature horses.
  • Because they are so small, physics allows for corrections in miniature horses that wouldn’t be realistic in a larger horse.
  • Not trimming aggressively enough is one of the most common mistakes farriers make when working with miniature horses.

I ask myself two questions: “What can be done to help?” and “How am I limited by what I think I already know?” There are many times I have been surprised — shocked even — by what I’ve been able to accomplish with miniature horses and dwarfs. You must take care not to put yourself in a box where you think you can’t help because of what you are sure you already know. There is a good chance you know something that can help. If I haven’t been told I can’t, and I believe I might be able to help, I give it a shot.

Limb-Deviations_AFJ_0923_Opening-Art.jpg

Lizzie arrived at Peeps Foundation with foot problems and deformed and infected ears. Before being rescued, Lizzie was kept in a paddock consisting of four pallets strung together by twine that could be moved as fresh grass was needed. ALL IMAGES: CURTIS BURNS

Limb Deformity Assessment

Any miniature horse can be a carrier of a genetic mutation that causes dwarfism. Dwarfism is characterized as either proportional or disproportional and the severity of deformities depend upon the type of mutation that occurs — with four mutations possible. The first mutation, combined with any of the others, is lethal and will abort the foal. The other three are:

  • Achondroplasia: disproportionate body characteristics that can include short necks (head longer than the neck), vertebrae deviations (roached back), compacted rib cage (girth deeper than length of leg) and limb and hoof deformities.
  • Brachycephalic: disproportionate face characteristics that can include bulging eyes, high set nostrils, extreme dish, underbites, tooth crowding, and a large/disproportionate head.
  • Diastrophic: multiple limb deformities, cow hocks, ligament deformities, pot bellies, weak hind ends, and roach backs.

In addition to disproportional characteristics of the body and face, there are other unexpected effects and long-term considerations, including: movement limitation, mental retardation, muscle atrophy, digestive complications, organ failure and arthritis.

When assessing the horse, I consider three factors: The first is the grade of deformity. I determine the origin of the deviation and ask at what point in the limb it starts to change. The second consideration is the age of the deformity: how long has the horse suffered from the deformity? Has it progressed over time, or does it remain the same. Finally, I consider the client’s financial ability. My price point is $45 per foot ($30 per foot for a disc, plate, or other piece of hardware plus $15 for a single-use pot of glue).

Correctional Trimming Considerations

One might be tempted to think that because a miniature horse looks like a scaled-down version of a traditional horse, the same or similar trimming protocols will apply. However, there are some important differences when trimming a miniature horse vs. its traditional counterpart to keep in mind.

First, these horses weigh less, and have very different movement and athletic demands than, for example, the performance horses I generally work with. Many are companion animals that are too small to ever have a rider.


“Any hoof length will compound any deformity they have…”


Second, because they are so small, physics allows for corrections that wouldn’t be realistic in a larger horse. For example, you can use a significantly sized extension as part of your correctional trimming plan and see positive results — something you wouldn’t be able to do on a full-sized foal or a Thoroughbred that is going to be running around a field at 20 mph.

Third, and perhaps the biggest difference, is that these horses really need to be trimmed aggressively to be successful. Because they weigh so little, their feet tend to grow a lot. Any length at all will compound, or exacerbate, any deformity they have.

Gain more insight from Curtis Burns by:

Trim While the Horse is Laying Down

Most of the dwarfs and miniature horses I work with are involved with the Peeps Foundation — an organization started by two gentlemen from the show horse world when they encountered neglected and abused miniature horses on a farm next to a place they were renting in Kentucky. The foundation was established to rescue and rehome healthy miniature horses and dwarfs, as well as to provide sanctuary for those that are too severely afflicted to be adopted. 

Lizzie, a 6-month-old dwarf, was one of the horses that came to be involved with Peeps. Before being rescued, Lizzie and Lizzie’s mare were kept in a “paddock” consisting of four pallets strung together by twine and could be moved as fresh grass was needed. Besides foot problems, Lizzie arrived at the Peeps Foundation with deformed and infected ears — these were chewed up by calves that were also living on the farm and reached into the paddock. After getting Lizzie cleaned up and making a few attempts to help a little bit with her feet, the Peeps Foundation called to see if I could assist. 

Limb-Deviations_AFJ_0923_1.jpg

There are a couple of reasons to trim from the laying down position. Some horses have such terrible deformities, it’s going to be difficult for them to stand on the “bad” leg when I’m trimming what is considered the “good” leg.

I trimmed Lizzie the way I trim most miniatures and dwarfs, by laying them down. (Figure 1). There are a couple of reasons for this. First, some horses have such terrible deformities, it’s going to be difficult for them to stand on the “bad” leg when I am trimming what is considered the “good” leg. The second reason is evaluative. I look at growth rate and depth of sole, aiming for optimal ground contact. I try to figure out what kind of movement there is in the joint and what angle I am trying to achieve. Generally, my goal is a 90-degree angle to the ground (Figure 2). If I am really trying to tip a foot one way or another, I might add a few degrees on the side that I am trying to get to lift or pull.

Limb-Deviations_AFJ_0923_2.jpg

I try to trim down to where I start feeling just a little bit of movement in the sole. I’ve found that heightened aggression, particularly in the heel, is necessary.

When I am trimming, I am always trying to get down to where I start feeling a little movement in the sole (Figure 3-3a). That might sound like I am taking off a lot of foot, but I’ve found that heightened aggression, particularly in the heel, is necessary. If any of the feet have a severe roll, I try to make sure I open that inside heel and remove any of the tubular horn. This encourages the foot to open and bear weight.

Limb-Deviations_AFJ_0923_3a.jpg

I try to make sure I open up the inside heel and get rid of any of the horn that’s actually tubular that’s rolled over into the heel.

Limb-Deviations_AFJ_0923_3b.jpg

When I trim, I look at growth rate and depth of sole, aiming for optimal ground contact. I try to figure out what kind of movement there is in the joint and what angle I am trying to achieve. Generally, my goal is a 90-degree angle to the ground.

Applying a Disc and Plate System

I knew miniature horses needed a different hoof-care solution than what was available. Several years ago, I tried correcting a dwarf horse with aluminum plates, but I found that removing those plates required great care and was quite honestly a little scary; the joints in a miniature horse’s legs are so tiny they could easily be injured. Experiences like this served as great inspiration to develop a better option. After some trial and error, what I ended up creating is a disc with a rotatable plate add-on (to offer more extension when and where it’s needed) that is financially feasible and effective, adaptable for limb preference, adjustable, and avoids solar heat through indirect gluing application (Figure 4).

Limb-Deviations_AFJ_0923_4.jpg

After some trial and error, what I ended up creating is a disc with a rotatable plate add-on. The screws on the plate allow you to rotate the extension to where you need it.

Originally, I had a left and a right option, but ultimately decided to create one that could be modified to be either a right or left.  All you need to do is trim off two of the tabs on one end or the other to tailor the disc to the desired foot.

Limb-Deviations_AFJ_0923_5.jpg

When preparing the plate for application, I use a Dremel to roughen up around the tabs so we get a really good bond. Sometimes, if you’re struggling to clean these areas, you can go over it with a mini torch; you’re just trying to burn off any oils that might still be present from the manufacturing process.

Prep work. Successful application of the disc and plate system depends upon solid foot and disc preparation. For Lizzie’s application, I use a Dremel bit tungsten carbide #9931 to debride the top layer of urethane on the disc, and score between tabs to increase adhesion (Figure 5). This should be done anywhere you anticipate glue contact. I then use a wire brush to remove excess dust from the scored shoe. After preparing the disc, I prepare Lizzie’s foot. I focus on cleaning up the medial wall very well, because that is where I am going to be bonding the disc (Figure 6a). I find that using a micro torch is very effective in drying the area for effective glue adhesion (Figure 6b).

Limb-Deviations_AFJ_0923_6a.jpg

I clean up the medial wall on Lizzie’s foot well because that is where I will be bonding the disc.

Limb-Deviations_AFJ_0923_6b.jpg

A micro torch is a handy way to dry the foot for effective glue adhesion.

Placing the disk. After I’ve prepared both the foot and disc, and I feel I am ready to glue, I mark on the foot exactly where I want to place the disc. I line up the first tab about where I would put a toe clip — with the centerline of the plane of the foot. I trace the tab with a marker. Now, when I’m buttering up the extension with my glue and I’m getting ready to put it into place, I will have a guide to assist with accurate placement. You wouldn’t think you need it, but when you’ve got a bunch of glue squishing around, you’ll be glad you did it. The foot should fit on half of the disc to enable its mechanics to work correctly. (Figures 7a-7b).

Limb-Deviations_AFJ_0923_7a.jpg

The foot should fit on half of the disc to enable its mechanics to work correctly.

Limb-Deviations_AFJ_0923_7b.jpg

The first tab should be aligned with the centerline of the plane of the foot.

Limb-Deviations_AFJ_0923_7c.jpg

The traced tab on the foot will act as a guide for placing the plate accurately on the foot.

Frosting the disc. I’m a strong advocate for mixing copper sulfate in the glue for a couple of reasons. First, I find the coarse sea salt texture of the copper sulfate allows the glue to bond well; second, the individual little pieces of copper sulfate that are next to the foot keep the bacteria level down. If the horse is going to be in these glue-on plates for long periods of time, the healthier we can keep everything, the better off we’re going to do.

Using a tongue depressor, I frost the inside of the tabs and spaces between — paying attention for possible air pockets (Figure 8a). I keep the amount of glue used level with the height of the tabs and I only apply glue where the shoe has been prepped (Figure 8b). A lot of the glue will squirt out through the tabs, and I will use my thumb to blend everything in (Figures 8c-8d).

Limb-Deviations_AFJ_0923_8a.jpg

Using a tongue depressor, I frost the inside of the tabs and spaces between — paying attention for possible air pockets.

Limb-Deviations_AFJ_0923_8b.jpg

I keep the amount of glue used level with the height of the tabs and I only apply glue where the shoe has been prepped. I place the disc and blend the glue on only one side of the foot.

Limb-Deviations_AFJ_0923_8c.jpg

A lot of the glue squirts out through the tabs. I use my thumb to blend the seams of the glue. I then support the bottom of the disc, without applying excessive pressure.

Limb-Deviations_AFJ_0923_8d.jpg

Blend the glue until it gets tacky. Then allow it to cure.

Throughout this process, remain aware of the heat cycle. I don’t want any more glue than necessary to be on the solar surface of the foot, so I can avoid it hardening up and creating a sore spot, or too much heat in the bottom of the foot.

Curing process. We know horses like to throw a tantrum at the worst time, so while the glue is curing, it is important to make sure you have enough hands on-deck to help. You’ll need someone to hold the limb well for you so you can concentrate on the foot and the disk itself and get through the cure cycle.

When everything is in place and I know I can release the foot, I am never in a hurry to stand the horse back up. Instead, I move to the back and do some trimming. It’s important to give the horse enough time so you don’t risk something coming loose or popping off. It’s good to have this strategy in place before you get started.

Plate Application. On Lizzie, we needed to use the extension plate (Figure 9). The way it works is straightforward. There are washers on both sides of the disc and the extension with what is called the “Chicago” screw. You loosen them up and rotate the plate into the place you need it. Then tighten everything up and you are done.

Limb-Deviations_AFJ_0923_9.jpg

The way the extension plate works is fairly straight forward. Simply loosen the screws, rotate the plate into the place it is needed, tighten everything up and you are done.

Disc removal. When it is time to remove the disc, simply trim it off — I generally use nippers and a half-round — one chunk at a time until I can rasp the excess glue. If it’s possible to do most of your gluing on one side of the foot, that will make it a little easier to remove at the end of each shoeing cycle. (Figure 10).

Limb-Deviations_AFJ_0923_10.jpg

It is easy to remove the disc without harming the foot/joint in the process. Simply trim off one chunk at a time until you can rasp excess glue.

Aftercare

In most cases, after the shoe application it’s appropriate for the horse to get out and moving the best that they can. In some cases that are more severe, I recommend using more caution — opting instead to hand walk them. Other considerations are:

  • Bedding. I also recommend being very careful regarding bedding. Some shavings are probably best initially so they don’t get tangled up or trip on extensions.
  • Pain management. In severe cases, there may be some pain management that is required. Ask your vet for a little help to determine the best options. For many of the horses in the care of the Peeps Foundation, Equioxx and Bute have been successful.
  • Shoeing cycle. It’s extremely important to keep these shoeing cycles close. The longer the apparatus is on the foot, the more it exaggerates the limb deformities. I recommend a 3- to 4-week wear cycle before replacement. 
  • Opposing limb management. As time progresses, you may notice that the horse’s opposing limb starts to go the wrong direction because of the added pressure to it. If you can, address this right away — definitely sooner rather than later so you don’t have another problem to fix.
Limb-Deviations_AFJ_0923_11.jpg

Our goal is that Lizzie has the confidence to move on a variety of terrains (pavement, grass, pavers) with full utilization of limb load.

It’s All in the Trim

I’ve found there are a few common mistakes that I see when it comes to these horses, which include:

  • Encapsulating the foot in glue and/or gluing both sides of the foot.
  • Giving up on minis whose pasterns appear fused. Many can still be helped with extensions.
  • Not trimming aggressively enough.
  • Trimming ineffectively.
  • Making too severe of an adjustment.
  • Length of time in between shoeing cycles.
  • Underestimation of what can be fixed.

Not trimming aggressively enough is probably the most common mistake I see with these horses. In a lot of cases, you need to really chop some foot off and that is going to help you long term. Understanding the animal that you are dealing with will help you provide the best trim — and that is really what it is all about. There are a lot of products out there, but it is not the product that fixes a particular problem; it’s about the trim. A certain product can do this or that, but if you don’t have a good trim; you don’t have much.