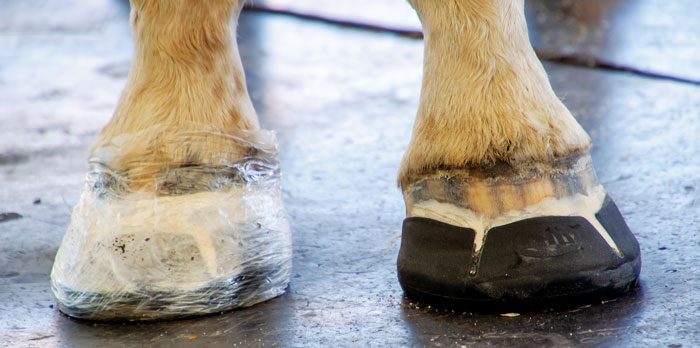
Roy Verocay doesn’t always glue on shoes, but when he does, the Port Orange, Fla., farrier uses GluShu and Glue-U Adhesives.
“Most of my shoeing — probably 80-85% — involves nailing,” he tells attendees of the 2024 International Hoof-Care Summit during the Glue-U Adhesives How-To Hoof-Care Product Knowledge Clinic. “The GluShu and many of the other shoes that I carry in my truck are alternatives if I need them. The glue-on shoe is a great tool that will get you out of a bind if you can’t nail, for whatever reason. It’s also something you can use to rehab a foot to get it back to nailing.”
However, some of Verocay’s clients prefer that their horses remain in the GluShu applications after rehab is complete.
“They liked how the horses were feeling and the comfort that these shoes gave them,” says the International Association of Professional Farriers APF-I. “So, they asked me to keep gluing them, even though they have perfectly fine feet to nail on.”
Takeaways
- A glue-on shoe is an effective tool that protects the hoof when nailing isn’t possible.
- Fitting the GluShu medial-lateral tabs flush with the hoof wall provides a better application and an efficient use of adhesive.
- Strike the GluShu with flat hammer blows to avoid damaging the aluminum shoe’s rubber cuff.
Verocay supplied nine tips for successful shoe application during the Glue-U Adhesives How-To Clinic.
1. Snug fit
A successful glue-on application requires a snug fit to the hoof wall.
“You want the medial-lateral tabs to fit flush and flat on the wall,” Verocay explains. “You don’t want a lot of play on the shoe because the bigger the gap you have, the more glue you’ll have to use to fasten it to the foot.”
Just as size is important when nailing on a shoe, it’s equally necessary when gluing.
“If you have to over-shape a shoe that you kink the heels in, squeeze it too close together or widen it too much, you probably have the wrong size shoe,” he says. “You’ll want to go up or down a size.”
2. Shaping the shoe
To ensure that the integrity of the shoe holds up, you must be cognizant of your hammer blows.
“I’m not careful about how I hit it,” Verocay says. “The only thing I’m conscious about is that I’m hitting flat. I don’t want to hit with the back side or the forward side of the head because I’ll start cutting into the rubber.”
3. Leveling the shoe
Before nailing on a traditional metal shoe, it’s critical to level it at the anvil. Otherwise, the odds of losing a shoe increases. It’s no different for the GluShu. The glue’s bond to the foot can be compromised and come off.
“When leveling the shoe, put the cuff flat on the anvil and strike it from the toe to the heel,” Verocay explains. “If you need to level the other side, leave the cuff up and strike it over the cuff. Don’t forget to hit it flat. If the cuff is nicked, you’re not hitting flat with your hammer.”
4. Caudal support
When a horse requires support in the back of the hoof, but pressure isn’t desired at the toe, such as with a laminitic horse, reversing the shoe is an option. After shaping the application to a reverse pattern, fit the toe under the heels so it creates a bar.
“The bigger the gap, the more glue you’ll need…”
“Soften the landing under the heels a little bit with your grinder so it doesn’t catch and slap the foot down,” he says. “You also grind the breakover at the end of both branches. You’re inevitably going to see the aluminum shoe. You can keep grinding to the widest point of the foot or the center of rotation, so you allow the horse to move freely. You can combine it with a wedge pad just to give it more pitch, if you need to.”
5. Rolled & rocker toes
When a horse requires eased breakover with a rolled or rocker toe, the most efficient means to achieve it is at the grinder.
“Find out before you glue it by putting it on the horse and ensure that it’s comfortable,” Verocay says. “Make a mark across the bottom of the foot and your shoe where you want the rocker or rolled toe. Grind the backside into a rocker or rolled toe and keep the highest part of the shoe at the center of rotation. When you glue it on the foot, line it up and drop it on the mark.”
6. Hoof shapes
When gluing shoes onto narrow feet, such as club feet or mules that have straight quarters, it’s best to start with a hind pattern shoe.
“The hind patterns are narrower and the quarters are straighter,” he says. “It’s going to allow me to bring it to the anvil and close the shoe, then maybe kink the heel a little bit. It’ll be a much easier shaping experience.”
What happens if you don’t have a hind pattern in your truck? The same thing you do when you don’t have a traditional hind shoe — modify a front into a hind.
“It’s easier because the rubber absorbs a lot of the hammer blow,” Verocay says. “I rounded the edges of my anvil so they’re not so sharp and scuff the rubber.”

The aluminum shoe that’s encased within the rubber can be shaped to the hoof for a custom fit. Striking the shoe with the back or forward side of the hammer head can damage the rubber. Striking with a flat blow avoids damage. Jeff Cota
Beginning at the anvil’s tail, Verocay straightens the branch after four blows at the toe quarter. He repeats the process on the opposite toe quarter.
“We’re starting to get a rough hind-shoe shape,” he says.
Two more blows close one branch, followed by the other. Verocay completes the hind pattern with a couple of more blows to close the heels.
7. Wedging the foot
There are a couple of options that he suggests if a horse requires wedging. The first option involves tracing the shape of the shoe on a wedge pad and trimming it to fit inside the shoe. The second is building a wedge on the shoe’s ground surface.
“This allows you to get much more wedging than something that is going to be crushing the heels, because the foot will be sitting flat on the shoe,” he says. “So, there’s no pressure on the heel. However, if you’re going to wedge something high, you have to support the center of the foot. Weak feet will prolapse a lot of time and fall through the middle of the shoe.”
Your choice of a wedge might hinge on the climate and terrain the horse lives or works in.
“We mix the glue with aquarium sand to increase its strength, so it is more resistant to wear,” Verocay explains. “In Florida, we have soft ground, so it’s not a problem. In northern states and out West where the ground is hard and has rocks, you might need to do a partial wedge with the glue and a wedge pad inside the shoe. It’s up to what your horse is doing. If the horse is working a lot on hard ground, you might lose 1 or 2 degrees off the wedge. In Florida, we don’t lose any.”
8. Building a wedge
When building a wedge with glue, Verocay begins by scuffing the heel’s ground surface. It doesn’t take much. Just remove “a little bit” of shine off the rubber coating and mix the glue with the sand.
“When mixing anything into the glue, stay about 10% of the total volume of the glue with sand, copper sulfate, or whatever you’re adding to it,” he advises. “So, if you use too much copper sulfate, it’s not going to stick to the hoof wall or the shoe.”
Improve your efficiency and success by shaping the shoe before building the wedge from the adhesive.
“If you need to close the heel and you already have your wedge on,” Verocay says, “it will pop loose once the shoe starts turning.”
Building wedges from an adhesive is like a haircut — you can always take more off, but you can’t put it back on.
“When I’m working with a vet to fix something like a negative palmar angle, I add extra height on my wedge so I can lower it as needed,” he says. “We put the shoe on the foot without gluing it and let the horse stand. The vet takes an X-ray so we can look at the alignment. If it’s too high, I can take it to the grinder and remove the excess. Check it again, now you’re happy. Glue it on.”
9. Charging clients
The cost of gluing on shoes is typically higher – and it’s not just because more money is tied up in materials.
“You have an extra skill when you’re gluing on shoes that other farriers don’t have, so that’s what you’re charging for,” Verocay says. “Let’s use round numbers. Let’s say shoeing a horse on the front and trimming the back is $100. Let’s say that in between shoe, glue, mixing tips and all the materials that I’m going to use that I have another $100 or so in materials. I’m still going to charge $100 for the front shoes, $100 for materials, and I’m going to double my materials. So, I’ll shoe the front for $300.
“Double the price because it’s the knowledge and the time that you spend to come to the International Hoof-Care Summit to learn how to use something new,” he continues. “When you travel to learn something new, that’s an investment in your business. It’s something that you’re doing that others aren’t.”


Post a comment
Report Abusive Comment