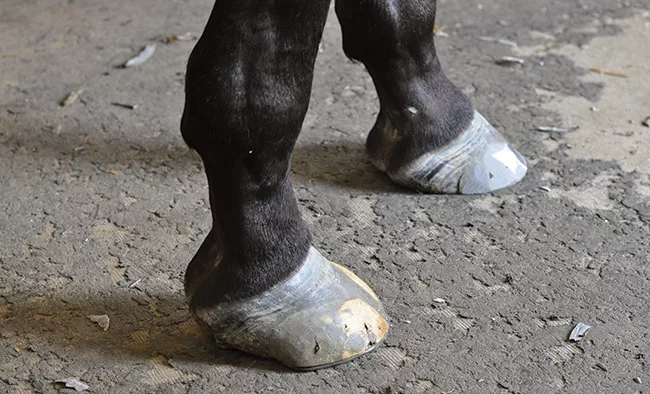
Figure 1. An improperly placed horseshoe can become a lever and magnify distortion issues.

Since the hoof can and does conform to the stress placed upon it, that hoof is constantly adapting. Distortion such as hoof-wall flares and sheared heels are two of the most identifiable examples of this kind of remodeling. When farriers trim a hoof, we try to bring it back into normal form for that individual foot. I say “individual foot” because normal does not mean uniform.

In 1983, Scott Simpson, founder of the farrier training program at Montana State University, identified five basic shapes of coffin bones. These findings were confirmed in 1993 by Texas farrier Danny Taylor, who evaluated many X-rays. This means “normal” can be different from horse to horse and even from limb to limb.

When a shod hoof endures daily stresses from its workload, changes occur. The longer the duration (i.e. shoeing interval), the greater those changes can be. Also noteworthy is the fact that when a shod hoof begins to distort, the rate of distortion increases as the time since the last trim increases — a classic snowball effect. This is why a beautiful shoeing job can look like crap 4 to 5 weeks later.

Horseshoes And Hoof Distortion

The reason to specify “shod hoof” is because a horseshoe stops the natural erosion of the hoof that limits distortion of the dorsal (front) hoof wall. If the shoe isn’t placed properly on the hoof to begin with, or if the hoof grows beyond the “tipping point” of good balance, a horseshoe can actually become a lever that magnifies distortion (Figure 1).

Yes, I realize horseshoes were invented to stop erosion of the hoof in active horses; however, no erosion also has its price.

Let’s take a look at the visual reference points or landmarks a farrier uses to re-balance the hoof capsule. Many factors, including conformation and gait, influence hoof distortion. While the focus here is on the hoof, the bottom of the hoof is the last thing a good farrier looks at when planning his or her trim. Because most horsemen will recognize conformation issues above the hoof, I will stick with the hoof itself.

Finding Landmarks

When looking at the bottom of a trimmed hoof, my first and main reference point is Duckett’s Dot (DD), named after Pennsylvania farrier David Duckett, who first identified this landmark. It is directly over the center of the attachment between the deep digital flexor tendon and the bottom of the distal phalanx, also called the coffin bone or P3. DD is also above the symmetrical center of P3 and about 10 millimeters behind the point of the trimmed frog. It is noted in Figure 2 by the white cross.

The next reference is the widest part of the hoof (Figure 2, green line). Where the bars end is known as Duckett’s Bridge. This is noteworthy because below this landmark is the center of articulation between P3 and P2 (the middle phalanx or short pastern bone).

Stanley-moving-pic2.jpg

Figure 2. The white cross represents Duckett’s Dot. The green line marks the widest part of the hoof. The blue line marks the back of the frog.

Stanley-moving-pic3.jpg

Figure 3. During the intervals between shoeings, the hoof wall of a shod hoof tends to migrate forward. One result is the abnormally thick hoof wall you can see at the toe. This type of distortion needs to be managed at every shoeing.


The blue line in Figure 2 shows the back of the frog. As the heels of the hoof wall grow, they tend to migrate toward the toe. Trimming those heels down actually lengthens the depth of hoof wall back toward the blue line. In fact, the entire hoof tends to migrate forward. An abnormally thick dorsal wall (Figure 3) illustrates this.

Horses that have this distortion can develop a number of soreness issues if the issue isn’t addressed at each shoeing. Coffin joint pain, sore heels and sore ankles are a few such potential problems that may develop if dorsal hoof wall distortion is left unchecked.

As mentioned earlier, there are five basic shapes of P3. The upper third of the hoof wall that you see before the hairline is where the hoof wall and P3 are attached. The hoof wall will conform strictly to P3 in this region. Any deviation of that shape in the lower two thirds is distortion.

Knowing how the visual landmarks on the outside of a hoof relate to the structures within will help you “see” hoof balance. Sometimes this involves extending a shoe beyond the hoof wall perimeter in order to keep the frog (and Duckett’s Dot) centered within the shoe in the medial/lateral (inside/outside) aspect.

Squaring the toe or extending the heels can aid in the anterior/posterior (front/back) aspect of balance.

Recognizing when the hoof is drifting away from uniform support of P3 (and thus the rest of the skeletal limb above) can help you adopt trimming and shoeing strategies to reduce undue stress on that limb.

Using The Knowledge

Given the fact that a horse’s hoof does move, change and adapt to the stresses placed upon it, means we actually are trying to shoe a moving object. This is why we can get into trouble by stopping that movement with restrictive shoes (although that’s a story for another time). As stated previously, a good shoeing job still looks good 2 weeks later. After 3 weeks it looks OK. At 4 weeks, it needs to be redone. Get to 5 or 6 weeks and that good shoeing job looks pretty bad.

Part of good farriery is prediction. Anyone who has been duck hunting knows you never shoot at the duck. You aim where you think the duck will be when the shot arrives. The same kind of forward thinking can help prevent us from shooting ourselves (or our horses) in the foot.