I’d like to share a step-by-step quarter crack repair method that we have adopted at Chester County Farrier Associates. For 37 years, we have been seeing poor quarter-crack repair jobs, infections resulting in lame horses and repair failure. We needed to come up with a simple, easy-to-apply system.
This is not be an article on how to shoe these horses. I would like to assume some base knowledge that the horse is well-balanced and fit with the appropriate shoe.
In 2009, we repaired over 20 quarter cracks. All of the horses involved remained in work and had no complications as a result of this method. It is also designed to be simple for an owner to maintain, as the repair is meant to be self-cleaning.
Of the conventional crack-repair methods, we most often see the stitch method. Though somewhat effective in stabilizing the hoof, it is plagued by failure, even when applied by the most skilled. Some of these patches are nice looking, but lack function. Poor design leads to failure in several areas, including:
Un-weighting the heel area: This is a bad move — unless you want to keep coming back to “patch.” This is a sure way to make this an uphill fight.
Patches that create areas that may lead to infection. Patch separations that lead to small pockets, which can trap water and dirt, are more of a problem when you apply adhesives over wire stitching. The adhesive may come loose and the wire remains attached. Other complications may be caused be repairing over live tissue, even when you think you are not close to sensitive tissue. Complicated and improper drain placement is another area where infection can bite you
Drilling errors. Let me tell you, you need to have many hours of practice before you are halfway qualified to attempt this. More often then not, hoof horn is too easily damaged along the leading edge of a crack. That damage leads to a loss of strength and sets up a nice place for infection to set in.
A patch shape that fails along leading and trailing edges. You would think by now that this would not be such an issue. This problem was identified in wartime ship repair. Naval engineers figured that placing a heavy patch along damage in the hull of a ship would make the damaged area as strong or stronger then the original material.
Wrong! Instead they found that the patch would fail along its edges. You need to have a repair that closely matches the strength and flexibility of the original material. Matching the form of the structure is also critical.
These issues make many repair methods not practical or worth the risk when there are much simpler and more effective methods available.
This method dramatically lowers the skill level needed to successfully repair any quarter crack. Depending on the crack and the horse’s occupation, these patches will stay tight for up to 3 months. They are easy to trim out. As they grow down you can cut or rasp through your repair easily. The average time to apply one is about 30 minutes.
The sample hoofs were all shod with some form of a heart bar shoe with significant frog pressure. None of the quarter crack is un-weighted.
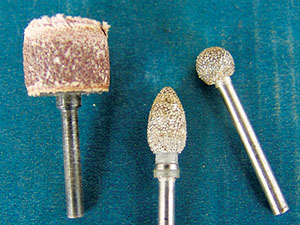
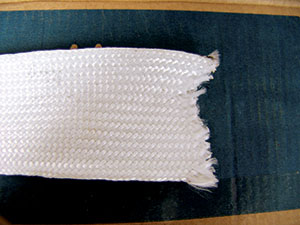
The tools I use for this include the Dremel (above) bits and fiberglass (left). The fiberglass is cut up and mixed with the repair material. I generally use Equibond brand of adhesive for all repairs
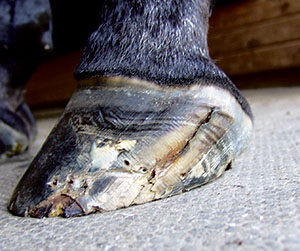
This is a sample, showing a hoof after removal of an old patch. Trimming was actually able to remove some of the “hump” in the hairline, although not as much as one would like.
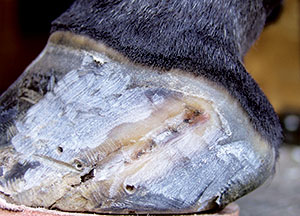
Simple and fast hoof preparation is done with a rasp or Dremel tool. I prefer the Dremel, using a large ball-shaped burr to round all crack edges, removing wall from the back of the crack.
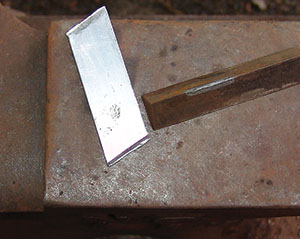
Patches are made from 1/8 to 1/16 inch thick aluminum you can buy at any hardware store. For $5, you can repair a dozen cracks. The patch extends about an inch beyond each edge of the crack.
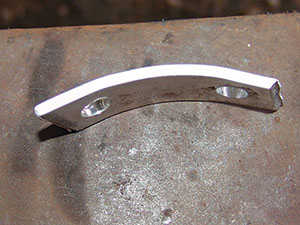
Using the step of your anvil, bend the patch to the contour of the hoof wall at the heel. Drill 5/16-inch holes at either end to help maintain perches of the patch. This is also the time to add drain holes along the center of the patch. I use a 1/8-inch drill bit for these holes. Notice that these are bit sizes you probably already have in your truck. Nothing complicated!
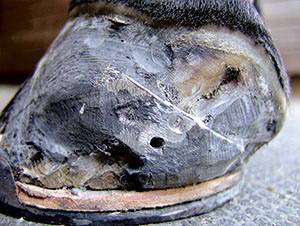
I generally start the patch about 3/4-inch below the hairline, depending on the crack location. (Some of these pictures show patches that have been on several months.)
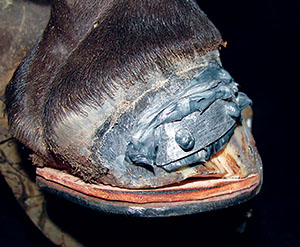
This is a patch without drain holes, fit tight to hoof. You can form drains each and every time you place the patch on the hoof wall. A 1/16-inch layer of glue will give you a nice space behind the patch to allow for cleaning and air flow.
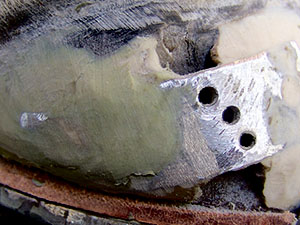
This picture illustrates a patch with holes drilled along the centerline. Note how the repair is “feathered” toward both the front and rear of the crack. This will help prevent, if not completely stop, new cracks from springing up along the leading edges.
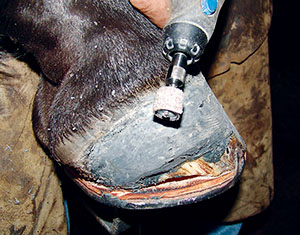
You can finish the repairs with the same tools. A hand-sanding drum works well and so will a rasp. Again, note the tapers on both the front and back edges.
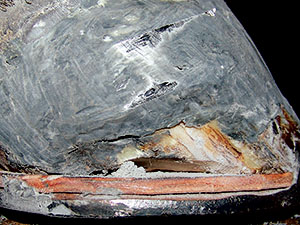
This is a patch with no drain. This type of patch is used once the patch is half-grown out and it is applied above the old crack. This leaves no chance of trapping any materials which might otherwise cause cracks.




Post a comment
Report Abusive Comment