TOM CLARK is one of the most energetic workers you will ever meet. I recently spent several days at his Ozark School of Blacksmithing in Potosi, Mo., which he founded in 1997.
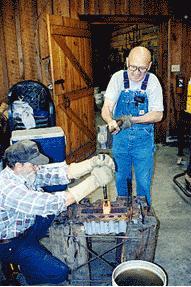
Tom Clark drives the drift through the eye of the steel with a huge sledgehammer as his partner, John Misbauer, tries to remain as calm and steady as possible.
While the entire experience was enlightening, one of the most educational moments came when Clark showed me how to make one of his incredible hammers. I have been using his hammers for several years and have found them irreplaceable for a lot of the forging work that I do.
All of Clark's hammers are made out of 1045 steel because he believes a lot of people have trouble using some of the exotic steels in both the forging and heat-treating process.
The First Steps
Clark begins the process by cutting a piece of stock for the size of hammer that he wishes to make. The piece is then heated and placed on an air hammer.
A slit chisel is dipped into a solution to keep it from sticking to the soon-to-be hammerhead and then placed on top of the hot piece of steel.
Once on top, the chisel is driven through the metal until a hole is formed. A light blow on the side of the hammer releases the slit chisel from the hot steel.
Once this process is complete, there is a hole through the center of the stock and displacement of the steel to the sides of the hole. It looks like huge frog eyes, similar to those that you get on handmade horseshoes. Having the mass of steel on both sides of the eye is important because it enables the blacksmith to get a lot more work done with each stroke of the hammer.
Clark rounds off one end of the hot steel and flattens out the other.
Grab A Partner
The next step is one that requires a lot of accuracy by Clark and a lot of trust from his assistant, John Misbauer.
The piece of steel is again heated and placed on a swage block. Misbauer places a drift in the hole Clark already punched through the stock. Clark pulls out the huge sledge hammer and drives the drift through the eye. At the same time, Misbauer is still holding the drift and has to tell Clark how close he is to the line that indicates the size of the hole. All of this is very exciting yet scary because Misbauer has a slight tremble in his hands.
Adding Some Force
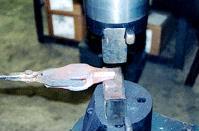
Now that the drift is firmly wedged inside the eye, it's used as a handle so Clark can take the hot metal to a power hammer. Here, Clark forges the sides of the hammer on both sides of the eye. It's critical when making a hammer to put more mass around the area of the eye. This allows the hammer to hit with more force than one that is necked down behind the head. Clark continues the process until the eye is the size that he wants it to be.
Size And Style
Clark's next step is to produce the particular style of hammer that was ordered by a farrier. In the example he shows me, Clark makes a clipping hammer of his own design.
At the Ozark School of Blacksmithing, Clark makes hammers to fit almost any need.
He begins by forging one end of the steel flat and the other end round under a power hammer. The hammer is now roughed out and needs to be annealed before the tedious process of grinding begins.
Annealing makes the steel as soft as it can be in the cold state, which is done by slowing the rate of cooling. To do this, Clark heats the hammer to transition heat (approximately 1,475 degrees Fahrenheit) and places the hammer in vermiculite (available at most garden stores). This temperature is determined by testing the hot steel with a magnet. When the magnetism is gone, the steel is in transition. The hot hammer head is placed in a metal bucket filled with vermiculite for a minimum of 12 hours.
The Finishing Touches
After annealing the steel, Clark must grind it down to size. Following the grinding, the last step is heat treating. Clark heats the hammer head in a gas forge and quenches the steel in rain water heated to a specific temperature in order to attain the desired hardness. A little bit of polishing will finish off the job.


