Using adhesives in your farrier work isn’t much different than when you first started out forging shoes and nailing them on. It simply takes time and practice.
“The first few years of your farrier career, you’re thinking, ‘This has got to get easier,’” recalls Pat Reilly, chief of farrier services at the University of Pennsylvania’s School of Veterinary Medicine. “You start working a shoe in the fire and you’re all concerned about how long you’ve got heat and things like that.
“Glue-on shoes are no different. A lot of farriers, even seasoned farriers, get stressed out as soon as they start mixing adhesives because the clock is running. The more you do it, you have this internal clock where you just get accustomed to how much time you have. It really does get easier.”
Reilly teamed up with Cornell University head farrier Steve Kraus and Wellington, Fla., farrier Curtis Burns at the 13th annual International Hoof-Care Summit in Cincinnati, Ohio, to discuss “Eliminating Mistakes And Misconceptions That Hamper The Use Of Adhesives.”
Are Adhesives Safe?
The most commonly used adhesives are methyl methacrylate (acrylic) and polyurethane. And one of the most commonly asked questions is: Are adhesives safe?
“Yes, for the most part they are,” Reilly says. “This is not something that’s only used in the equine world. These are adhesives that are being used and have been used for a long time in manufacturing processes.”
Farrier Takeaways
Adhesives do not damage hoof wall, rather poor hoof preparation and gluing techniques are the biggest culprits.
A moisture meter can improve consistency and success in bonding adhesives to hooves.
Layer adhesives to maintain lower temperatures when applying them to compromised or thin hoof walls.
Employing a drain when patching hoof cracks will allow the area to be treated should an infection set in.
That doesn’t mean, though, that some common sense shouldn’t be exercised. He advises to:
- Use adhesives in a well-ventilated area. “Most barn aisles,” Reilly says, “are well-ventilated.”
- Avoid direct contact with skin. “That’s kind of a no-brainer,” he says, “because otherwise we’re all going home covered with glue.”
- Use common sense. “I can tell you what these adhesives taste like, but it’s not on purpose,” Reilly says. “I pulled gloves off with my teeth and I know there’s a bit of a minty flavor in there.”
He also notes that the adhesives affect different people in different ways.
“It seems that the biggest complaint and the biggest concern is there is a little bit of an acidic vapor that some people seem to have a little bit of a skin rash or irritation,” Reilly says. “It seems to irritate some people’s airways a little bit. I know some people say it gives them headaches, but that’s not mentioned anywhere in the literature.”
While urethanes don’t have the odor that acrylic adhesives have, you still should follow the basic guidelines.
“Just because there’s no odor doesn’t mean you don’t have some of the same potential issues,” he says. “You should still make sure you have some ventilation.”
Do Adhesives Damage Hoof Wall?
As there are questions about whether adhesives are safe for humans, there are some who believe it’s detrimental to the horse. It’s simply false, Burns says.
“Probably the No. 1 thing I get asked about all the time is technique for gluing,” says the inventor of Polyflex horseshoes. “When you don’t stick to the script, sometimes just one thing can be the cause of failures.”
Those failures can give the false impression that the adhesive caused the problem.
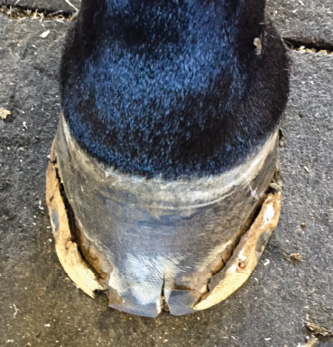
Figure 1 Photo: Curtis Burns
“This is what we see all the time (Figure 1) and then we hear that glue rots the feet out,” Burns says. “It’s just lack of preparation and doing things right.”
The trio offered some tips for success:
Good hoof prep. It’s critical that the foot must be clean and dry to ensure a good bond. That includes debriding any loose or broken up hoof wall before you start gluing.
“If you don’t,” he says, “you’re just setting yourself up for terrible failure to where the foot is going to continue to break down.”
To ensure that the hoof is dry, Burns suggests using a meter that construction workers use to test the moisture content in wood.
“I think that’s one of the biggest breakthroughs,” he says. “I didn’t know whether it would really work or not, but it was the best $50 I ever spent because I started teaching people how much moisture content is in a freshly trimmed foot. It was amazing.”
If the moisture meter reads anything other than 0, Burns uses a torch to dry the foot. Once the foot is dry, it’s important to protect your hoof prep.
“I’ve run across so many farriers who will do all the work and cleaning, prepping and getting this horse in a good place, ready to bond, and they’ll set it down on the floor, on a rubber mat or wrap it in plastic, which can cause it to start sweating again,” he says. “You really want to protect all that investment of time and put a boot on it until you’re ready to actually put the glue on the foot.”
A cooperative horse. A horse that will not stand well will be a nightmare to glue. The horse’s temperament might influence your choice of adhesive.
“Methyl methacrylate builds this bond and the curing process at the end of the cycle so you can frost the cake with it, so to speak,” Kraus says, referencing such products by Equilox and Grand Circuit. “You can work it and move it. Vettec products (polyurethane) are forming their bonds as soon as they come out of the end of the nozzle of the cartridge. So, you can’t move them around very much. You’ll destroy the bond. So you have to use them appropriately.”
Reasonable temperature. Although you can’t control the climate, there are precautions you can take to stack the odds in your favor.
“In cold weather, I place all of my materials on a heating pad,” Burns says. “Then, after applying the shoe, I use a heat gun to maintain the heat and try to get it kick started. Usually, no matter how cold it is, when the heat cycle starts, it will continue on for you. We use fast-set adhesives in this type of weather.”
It’s also important to learn and follow the script — a checklist of tasks to improve your chances for success. Here’s a look at Kraus’ script:
- Trim and balance the foot.
- Shape and prepare the shoe.
- Clean and smooth the hoof wall.
- Protect the coronary band and leg from adhesives by using an elastic bandage or similar product.
- Dry the hoof, if necessary.
- Final check for shoe fit.
- Use a sanding block to give the adhesive an area to bond.
- Put on gloves.
- Mix the glue.
- Apply glue to the hoof.
- Apply glue to the shoe.
- Wrap to set the shoe or hold it in place with a fast-set glue.
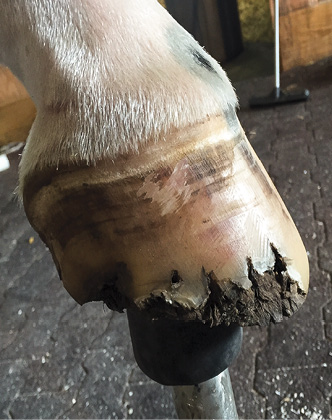
While flawed preparation and application can lead to failure, another culprit that damages hoof wall is improper removal of cuff-style shoes.
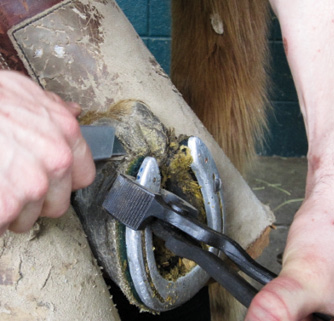
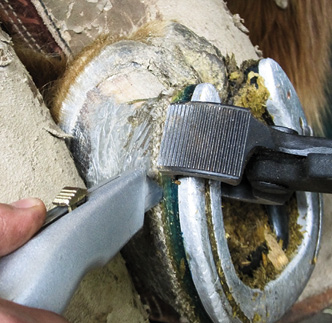

Figure 4
“You can’t just rip them off,” Kraus says. “You want to cut the fabric right against the rim pad and make sure you separate the shoe completely (Figures 2 to 4) and then roll the fabric off (Figures 5 to 6). Don’t try and jerk things off, you want to leave as much glue on the hoof as possible. I have people telling me the glue deteriorates the hoof wall. No, it doesn’t. What’s being deteriorated is you yanking the cuff off improperly and ripping the hoof wall away.”
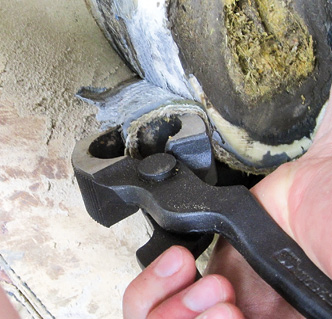
Figure 5

Figure 6
Is Heat Dangerous To The Hoof?
It’s a question that Reilly thought he had an answer to, yet he didn’t have proof.
“So, we grabbed some cadaver limbs and drilled some temperature probes and inserted them in the foot,” he explains. “We actually looked at this in different ways where we were measuring the effect of the exotherm on the foot by recording the temperatures at the layer of sensitive tissue.”
During the experiment, acrylics and urethanes were applied in various ways.
“The amount of heat that is generated is dependent not only on the material that we’re using, but also in the shape and how we are applying it,” Reilly says. “If you put 2 ounces in a big, solid mass, the heat is really going to build up. If you spread it out over a thinner layer, it’s not going to generate quite as much heat.”
Acrylics peaked at about 63 degrees Celsius (145.4 degrees Fahrenheit), while urethanes were 15 degrees Celsius (59 F) higher.
“Those are relatively minor changes,” he says, “on both the urethane and acrylic adhesives.”
Reilly took it a step further, though.
“One of the things we did just for the sake of comparison was to take a shoe and burn it on the cadaver foot,” he says. “Now, can you overdo burning a shoe on a foot? Absolutely, but we set this on for about 5 seconds so it’s a typical hot shoeing process for us.
“What we found while hot shoeing was a change of the layer of the sensitive tissue somewhere in the 12- to 14-degree (53.6 to 57.2 F) range, depending on which probes and which feet we were looking at,” Reilly says. “To put that into comparison, with a direct glue, you would see a change of about 5 (41 F) to 6 (42.8 F) degrees Celsius.”
It’s important to note that a live foot will react differently.
“Cadaver feet don’t have the advantage of circulation that would be radiating some of that heat away from sensitive tissue,” he says. “I’m less concerned about the thermal effects of shoeing because the hoof itself is such a good insulator.”
Yet, there are situations in which caution should be used.
“I’m not that concerned when it’s a nice, mature hoof that has a lot of wall thickness,” Reilly says. “But, if you’re looking at a foal hoof, yeah, that’s a much less robust surface. There’s a lot less material there. Anytime I’m working with a foal hoof, I become more attentive to how much glue and what kind of materials I’m using. If I have to put on a really big extension for some reason, I would do it in several coats rather than trying to put it on all at one thickness.”
Preventing Problems
Many times a horse that needs a glue-on shoe doesn’t exactly have the prettiest feet. The natural inclination of all involved is to make it look as nice as possible, but the trio advises against it.
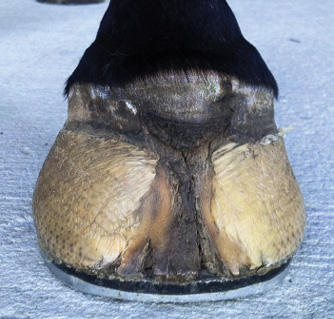
Figure 7 Photo: Pat Reily
“Here’s a horse that had a big avulsion injury to the toe (Figure 7),” Reilly says. “Is that an ugly looking foot? It sure is. It would be nice to fill that in with glue and make it all look nice, but I don’t have a whole lot of material there at the toe in terms of cornified tissue to insulate it from the heat. So, I think I’d be running a pretty big risk just by filling that in with glue and trying to make it look nice.”
Burns installs a drain each time he patches a crack to ensure that the site can be treated in the event of an infection. This practice came about after the tragic loss of a horse.
“Somebody had put a full patch over a quarter crack,” he recalls. “At day 5 of being non-weight bearing, instead of calling the farrier who had put on the patch, they called me. I told them the patch had to be taken off because the horse was in trouble. They said, ‘Well, we can’t take that off, we paid $800 for that.’”
Burns succeeded in persuading the client to take the horse to the clinic, but it was too late.
“The sad part of the whole situation is I know the farrier who applied the patch,” he says. “I can promise you, he would have been the first one who would have taken that patch off and been glad to redo it for free. But, there was a break down in communication.
“I’ve made a commitment to myself that in these situations I never leave without putting a drain in there — something where if it gets infected, it can possibly work its way out or be treated topically. I just refuse to let myself end up in that position of being the guy who didn’t get the communication back to him.”
Another tip to improve the health of the foot involves a simple addition to the glue — copper sulfate.
“I’ve had people say, ‘It’s suspended inside the glue and it’s not going to work,’” Burns says. “When you finish the foot off, you’ll see a certain amount of blue flakes across the outside of the glue. Well, the same thing is happening against the foot.”
The results have been positive.

“The first thing you’ll notice is the smell,” he says. “There’s none of that rancid smell. You can see all the green freckles (Figure 8) after we took the shoe off. When it’s cleaned up (Figure 9), the white line is tight. It’s just amazing the difference in the hoof quality.”
The Goal
All three farriers advocate that glue-on shoes are a temporary solution. The goal is to return the horse to nail-on shoes.
“A typical situation (Figure 10) that I get called in for is when hunters have been having shoes pulled a lot in shows, and then they’re turned out in the paddock and pulls them a few extra times,” Burns says. “I’ve heard farriers say, ‘I’ve never seen a foot I couldn’t nail to.’ I don’t have any idea why you would want to nail a shoe on that horse.”
Yet, good gluing techniques can help restore quality hoof wall so that the horse can return to traditional shoes.
“This is the same horse (Figure 11) in two shoeing cycles by doing everything right,” he says. “My goal is to put all of these horses that I end up gluing back into regular shoes. You can see that foot is ready to be nailed, no problem.”


Post a comment
Report Abusive Comment