Most top forging hands will agree that making a perfect plain stamped shoe can be one of the toughest things to do. While it seems like this should be one of the easiest shoes to make, it isn’t.
There’s not a lot of “jewelry” hanging on this shoe, just three-quarters of a circle with a few nail holes. In fact, the lack of clips, fullering, toe modifications, calks, etc., is part of what make this shoe so difficult to make. That’s because there is very little to draw the eye away from your forging mistakes. If the shape of the shoe is off a little, it will definitely show. And whether you have good or bad nail holes, they stand out on a simple shoe.
Not Easy To Do
Nail placement is critical when making a handmade shoe. Putting nails exactly where the foot demands them is one of the best arguments for making a shoe, but the farrier must have both the skill and knowledge to do this correctly.
Though nail placement is of the upmost importance, it will be the topic of a future article in this “Back To Basics” series. This article will deal with punching a proper nail hole into the appropriate bar stock.
The primary tools needed for punching a good nail hole are a forepunch and a pritchel. I also like to use a drift punch if I’m punching a shoe for city head nails. This doesn’t seem necessary when punching holes for E-head or MX nails.
The reason is that there is only one shape to be concerned with from the ground surface of the bar stock to the point where the pritchel takes over in punching the hole for an E-head type nail. With a City head, there’s a thicker piece of steel for the pritchel to deal with if you don’t use a drift punch.
Upon close examination, you’ll see a line near the top of the nail head where the head angle changes. This is most evident on City head or regular-head nails. Use this line near the top of the nail head as a gauge to determine how much nail should be showing past the plane of the bar stock.
If your hole is punched so deep that the nail can be driven past this line, there’s a good chance of having a loose nail in the shoe. There are a few reasons for this:
- A large hole will not properly fit the nail head tightly, allowing the nail to move in the hole. With activity by the horse, a shoe nailed on with sloppy nail holes will move on the hoof and quickly be lost.
- Deep nails can’t be properly set or clinched. When clinching tongs are used, the top jaw pushes down on the end of the nail while the bottom jaw pushes up on the head of the nail. If the bottom jaw can’t gain contact with the nail head, the top jaw will push the nail out of the hoof and shoe until the bottom jaw can gain contact. This results in a nail that isn’t tight and can lead to a lost shoe.
Punching the proper nail hole requires precision with both your tools and hands. Practice and good teaching can take care of the hands, but they can’t make up for badly shaped or damaged tools. (Those of you who have worked with me are probably laughing as you know my tools are not usually in very good shape. But the working end usually works.)
Get The Lead Out!
To fix a forepunch, a belt sander is my tool of choice. Sand the tool’s cutting end at the proper angle so it matches the shape of the nail head. Using a piece of lead that’s the same thickness as the bar stock the punch will be used with can help you grind your punches perfectly.
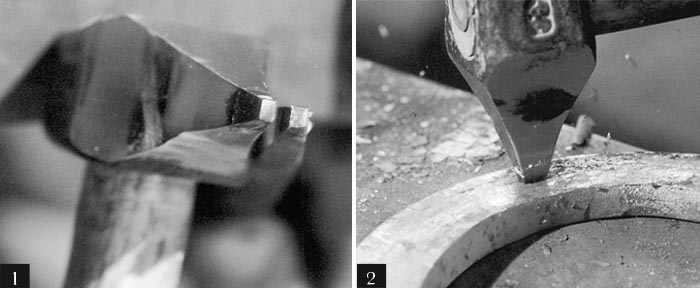
Some people have a good eye and do fine without using the lead. As I grind, I punch a hole in the lead, place a nail in the hole and determine what changes need to be made to the punch. Properly made tools will have the tip of the pritchel matching the tip of the forepunch (Figure 1).
For adjusting pritchels, I don’t use a grinder or sander. Forging the appropriate tip is not extremely difficult and will make a crisper cutting edge without any gouges from the power tool. I don’t know why, but I find pritchels are best sharpened in a coke fire. The longer the taper, the better the tool will work for you in making nail holes.
Now that your tools are ready, it’s time to learn how to punch a perfect nail hole. The heat-color of the shoe is an important factor, as you want to drive the forepunch or drift into the red hot steel (Figure 2).
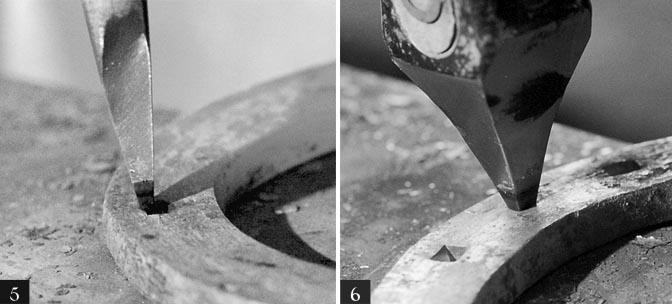
The hotter the metal, the more malleable it will be. While this means the metal is more plastic and soft, more metal will be displaced if it’s too hot. When more metal is displaced, larger frog eyes will result. Frog eyes are the name given to the bumps that form on the edge of the bar stock from using a forepunch. (Figure 3 on the edge of the shoe).
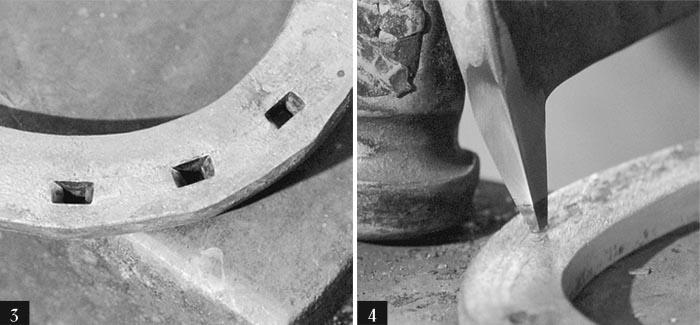
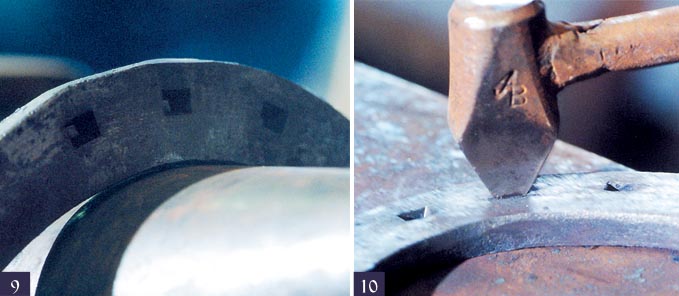
To place my punch exactly where I want it, I lean the punch against the hammer (Figure 4) and stand it up just before hitting it (Figure 5). Placing the punch this way lets me see exactly where the end of the punch is relative to the inside edge of the stock.
Punch It Quick
Don’t let the punch stay in the hole any longer than it takes to make an impression for the nail head. Leaving your punch in the hot steel too long will cause the punch to lose its temper. With the right punches used at the right temperature, it should only take three hammer blows to do the job.
Placing the hot end of the tool in Irish Spring soap will keep it from getting too hot and will help you keep the temper in the tool. Since a few brands of soap stink when burned, some farriers use beeswax, but this will get on the face of the anvil and make it slick. Hoof packing also works well.
It will take some time to get a feel for how deep to drive the punch (Figures 6 and 7). Driving too deep will make an over large, sloppy nail hole. It can also cause your punch to chip or mushroom from being driven into the face of the anvil.
Drive the punch far enough to make the hole a perfect fit for the nail head while leaving enough metal between the end of the punch and the anvil to protect the punch. The metal left in the bottom of the hole is the piece that the pritchel has to cut out.

After using the drift or E-head forepunch, turn the shoe over and hammer the shoe’s hoof surface flat with several well-controlled overlapping hammer blows (Figure 8). Hit directly over the area where the nails are punched.
Removing Frog Eyes
This is a good time to hammer box forward from the last nail back. The shoe will be cooling during these steps and should be the right temperature to remove any frog eyes.
To remove the frog eyes from the nail holes, place the shoe over the horn and hammer with overlapping blows while you slowly turn the shoe under the hammer (Figure 9). Repeat these steps with the shoe turned slightly so that the hammer is striking toward the corner of the stock.
Do this on both the ground surface and the hoof surface of the shoe. These hammer blows remove the frog eyes, soften the edges of the stock and crisp up the shoe by making all the lines flow.
Your shoe should now be just barely incandescent in color. If you are punching the shoe for City head nails, this is a good time to use your forepunch that’s shaped like a City head nail (Figure 10).
With City head nail holes, you’ve only used a drift punch so far. With E-head nails, going through the nail holes with the forepunch isn’t necessary.
Pritchel Time
You are only seconds from a black heat, the right time for pritcheling. Since a pritchel is a cutting tool, it should have sharp, crisp edges to cut out the small piece of metal that’s found between the bottom of the nail hole and the hoof surface of the shoe.
If the metal is too thick, your pritchel will not hold up very long. The ideal thickness of the piece being cut out should be half the width of your pritchel.
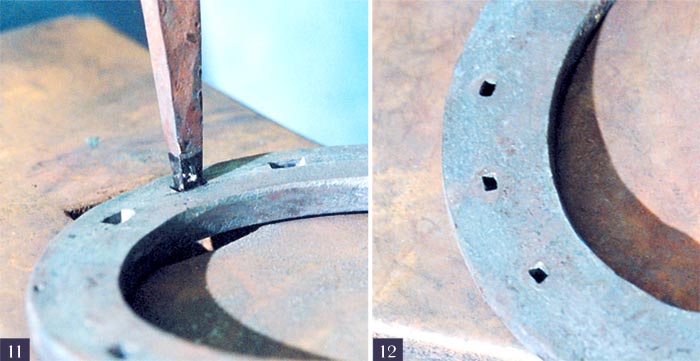
Quick sharp hammer blows on the end of the pritchel work best at this point (Figure 11). It should only take two or three blows and a rectangular piece will be cut out of the bottom of the hole (Figure 12).
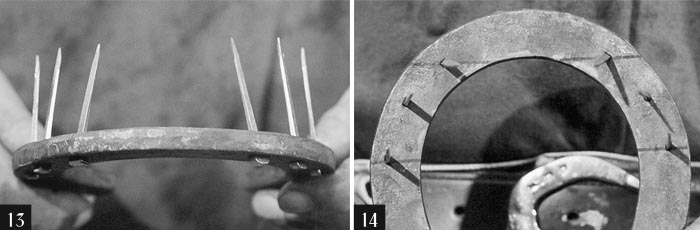
If you’re punching a hole for a toe nail, angle the punch so the nail will pitch to match the angle of the wall. Pitch is the angle that the nail will be at when it’s placed in the hole. It can be determined by placing the nails in the handmade shoe and turning the shoe over (Figures 13 and 14). If your nail heads fit on the ground surface of the shoe and stays in place when the shoe is turned over, it’s a good indication that you have a properly punched nail hole.
Angling the pritchel lets you dictate nail exit depth (Figure 15). When the nail exit depth is closest to the inside of the web, it’s referred to as coarse (such as the toe nail). Toward the outside perimeter, it’s referred to as fine (like the heel nail).
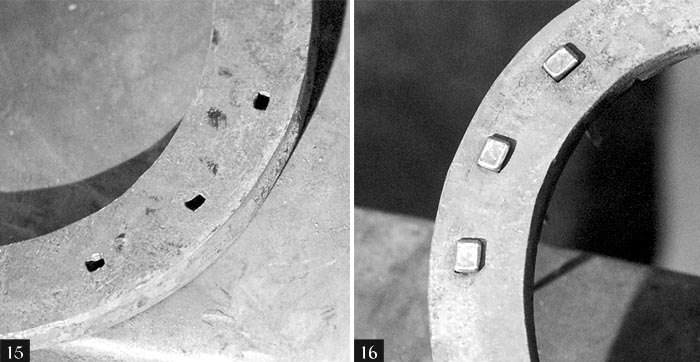
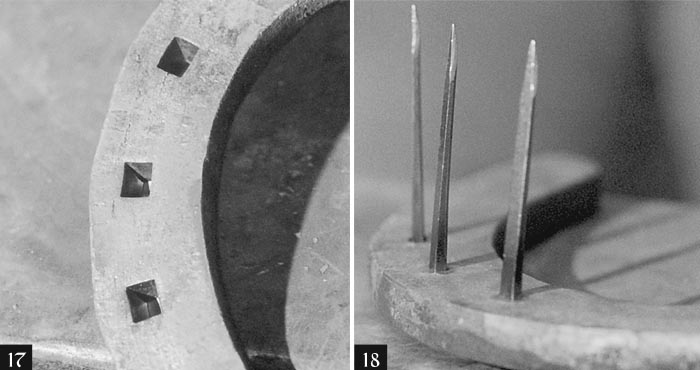
There is less angle on the middle nail and the heel nail can usually be punched with the pritchel held straight up and down. Notice figures 16 and 17 where the nails are placed in approximately the same depth on the ground surface of the shoe. However, there’s a difference on the hoof surface that we created by angling the pritchel (Figure 18).
Trying to pritchel the shoe when it is too hot will cause the metal to stretch instead of shear or cut. When this happens, the little piece will remain attached to the shoe and can cause problems. It’s also hard on the temper of the pritchel since hotter metal will easily heat up the thin tip of the pritchel.
Once your pritcheling is done, turn the shoe over and hammer once more on the hoof surface. If everything goes just right, your nails should fit perfectly. While you may have to run the pritchel through the holes again to clean them out, more practice will make this step unnecessary.
Avoid Backpunching
Some people like to backpunch, which is driving a pritchel-like punch through the holes from the hoof surface. I find backpunching is not a good idea as you’re driving metal through the hole in the opposite direction from which a nail will go. It can cause a burr that will spoil your nail fit.
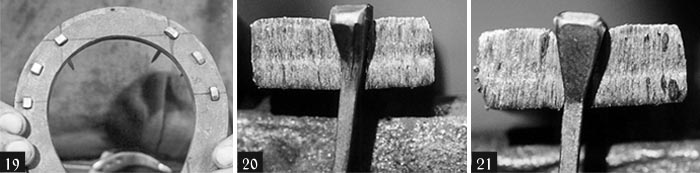
When this shoe was finished, lines were drawn to check nail placement. The pattern on the right of Figure 19 looked wider, but this was due to the fact that it was punched for City head nails, which have a wider head than the MX-50 nail holes on the left side of the shoe.
The toe nail on the right side of the shoe did not fit as well as the remainder of the nails. This can sometimes be caused by the angle of the pritchel when trying to gain more pitch at the toe.
Fitting Problems
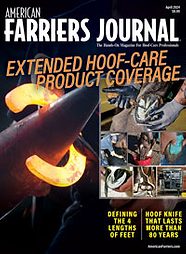
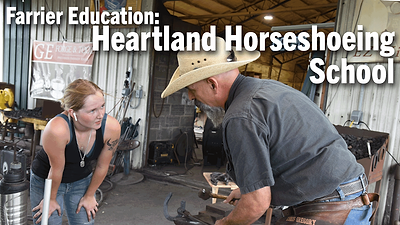
If you’re having problems fitting nails, try punching a nail hole in a piece of scrap bar stock and cut through the center of the metal with a hacksaw. By placing a nail in half of the hole, you’ll see what your tools are doing (Figure 20). I wanted to see exactly what impact the pitch was having on my nails, so I did this in Figure 21.
Like all forging exercises, this process becomes much easier the more that you do it. There’s no way to replace experience and practice. Just follow proper form and try to do each task with precision and care.
In no time at all, punching nail holes will be another easy task in your shoe building process.


Post a comment
Report Abusive Comment